
PomPom Penguin Paper Plate Wreath Craft for Kids
When school asked for donations of wool, so they could make Pom Pom Wreaths with KS1 (5-7yrs olds), I thought – oh no.. that is a LOT of wool you will need.
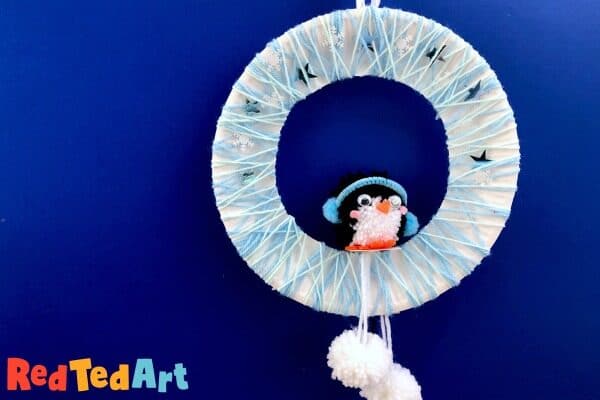
So, I thought I could come up with a simpler PomPom wreath idea – this easy PomPom Penguin Paper Wreath! A lovely craft for kids that works either as a DIY ChristmasWreath for Kids or throughout Winter. We love easy Winter Crafts for Kids.

Pom Pom Penguin Wreath for Kids – Materials
- Paper Plate per wreath
- White, black and blue yarn/ wool (if you have some with sparkles even better)
- Stickers, beads, sequence (optional for adding to the wreath)
- Pom Pom maker – learn how to use a pom pom maker here, or make your own Cardboard Pom Pom Maker and also use the Fork Pom Pom Method for the smaller white pom poms.
- Scissors
- Ribbon for hanging (though wool/ yarn fine)
- Embellishments for penguin – googly eyes, orange felt, pipe cleaner and mini pom poms (you can leave the last bit out)
- Glue or hot glue gun
How to make your DIY Christmas Wreath for Kids
You can either make your pom poms first or work on the yarn wrapped wreath!
Making a simple yarn wreath with paper plates

Begin by cutting out the centre of your paper plate – keep it, as you will use a little bit of the carboard later on for the Penguin to “sit on”.

Choose your wool in the desired colour.. tie it to the paper plate wreath. Make sure the knot is at the “back” of the paper plate. Start wrapping.
If you are short on time.. you can use two strands of wool at once, but personally, I like using them separately.

Keep wrapping round and round. If you need to switch colours or add more yarn, simply knot pieces of wool together. Just make sure the wool is towards the back. Try and wrap the wreath as evenly as you can.
Once finished, knot off on the back.

Now if you wish you can decorate with seasonal stickers or sequence. We had some stars and snowflakes that I thought would look nice! But anything goes. You can even get some beads. Thread them to some yarn and attach them individually by tying it to the wreath (again, pushing the knot to the back).

I knotted a white ribbon to the back for hanging. But you can also staple it in place or glue it in place with a hot glue gun (even sellotaping would work.. but maybe do this before you start wrapping!).
Next make your Pom Pom Penguins

I made the pom pom penguins on Red Ted Art before! Hop over to this Pom Pom Penguin How To! You can make these using pom pom makers or the Cardboard Pom Pom Maker method.
Make some Fork Pom Pom snowballs
Then come back and make two more smaller white pom poms (if you don’t have a pom pom maker, than the pom pom fork method is a great one for this smaller size). Leave some LONGish threads attached to your pompom, so you can hang it from your wreath.
Bringing your Penguin Paper Plate Wreath together
Now it is time to bring all your bits and pieces together!!! So excited.

I tied the two white snowball pom poms together and used the “tangly bits” left to tried them onto the bottom half of the yarn wreath. Make sure it is aligned with your hanging ribbon.

Next. Make a little “platform” from your left over paper plate card – this is a quick and easy way to glue your penguin to the paper plate wreath.

Glue the long bit of your prop to the back of Christmas Wreath. Fold over the top and glue the penguin on. With this method, you can use PVA glue (let it dry before gluing the penguin on) OR a hot glue gun.
If you don’t want to make the little “base” you can glue the penguin on with a hot glue gun…. but I find the seat really helpful (plus you can take the penguin off again at a later date, should you feel like it!).
Ta-daaaaa. Happy Christmas Crafting/ Happy Winter Crafting.
Hope you are inspired to have a go at our Pom Pom Penguin Paper Plate Wreath for the holidays!
Wouldn’t this look amazing as an adorable Sheep Paper Plate Wreath? I think I will be checking out my Sheep & Lamb Crafts to see what we can use!
More Winter Crafts for Kids here:
