
Printable DIY Fidget Spinner Instructions
Welcome back to yet ANOTHER Fidget Spinner DIY. Clearly, the craze has not yet ended.. and as many of you start planning for Summer Camps, Library events and other group events over the summer, I have had a number of you request PRINTABLE DIY Fidget Spinner Instructions for you. Many of you enjoy our easy to follow videos (I have embedded them for you below as a reference), but others need a quick and easy printable step by step guide. So finally, I have had the time to put one together for you! I hope you like it and that it serves you well this summer!
The fidget spinners we are making here are fidget spinners without bearings. They are super easy and fun to do. And perfect for scout groups and summer camps. We do have more Fidget Spinner DIYs for you browse – which include all sorts from LEGO Fidget Spinners to COOKIE Fidget Spinners (just brilliant). We also have a great Origami Fidget Spinner for you to check out. But this post focusses on our Printable Fidget Spinner Templates – that are easy to print out, decorate and assemble.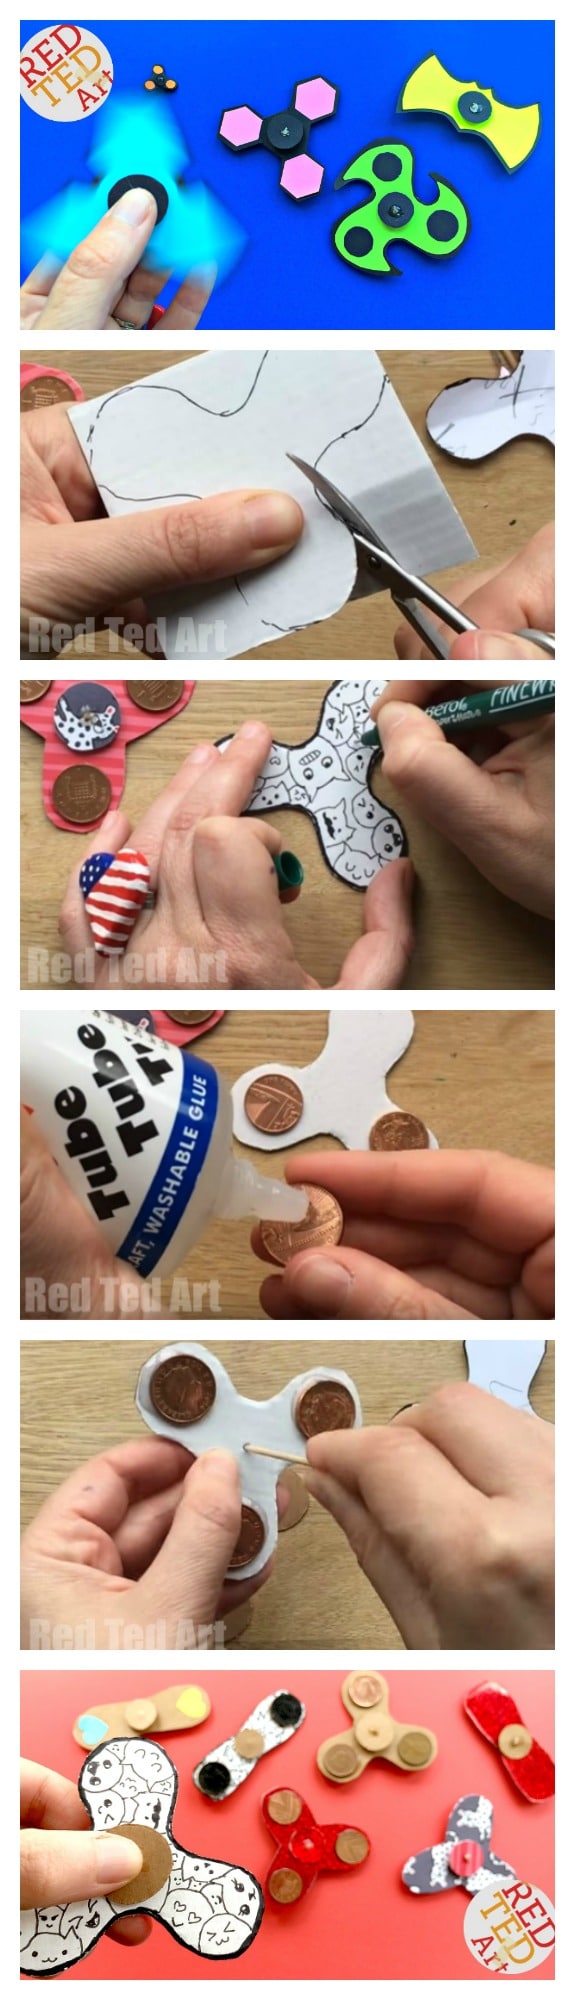
DIY Fidget Spinners – Materials
- cardboard (any card will do, if it is a little thin, use two layers and glue together)
- a toothpick
- 2 -3 penny coins (but some people have replaced these with buttons or nuts)
- I prefer using strong PVA glue BUT these can be made with a hot glue too, but they will not last as long
- a pin
- scissors
- FIND ALL TEMPLATES AND PRINTABLE INSTRUCTIONS AT THE END OF THE ARTICLE
DIY Fidget Spinners – How To & Printable DIY Fidget Spinner Instructions
I have written the instruction out for you here – but at the END of the post, you can download the instructions in PDF format! The PDF has MORE Photos for you and includes the templates too!).

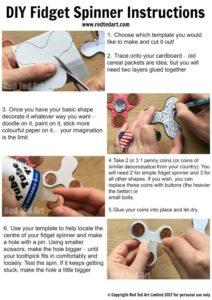
- Choose which template you would like to make and cut it out!
- Trace onto your cardboard – old cereal packets are idea, but you will need two layers glued together
- Once you have your basic shape decorate it whatever way you want – doodle on it, paint on it, stick more colourful paper on it… your imagination is the limit

- Take 2 or 3 1 penny coins (or coins of similar denomination from your country). You will need 2 for simple fidget spinner and 3 for all other shapes. If you wish, you can replace these coins with buttons (the heavier the better) or small bolts.
- Glue your coins into place and let dry.

- Use your template to help locate the centre of your fidget spinner and make a hole with a pin. Using smaller scissors, make the hole bigger – until your toothpick fits in comfortably and loosely. Test the spin. If it keeps getting stuck, make the hole a little bigger
- Now cut out 2-4 cardboard discs (if using cereal box cardboard you will need 4 in total, glue two together).
- Again take your pin and make a small hole. Use your toothpick to widen that hole, so the toothpick fits in tightly.
- Glue the first disc to the end of your toothpick.
- Insert the toothpick into your fidget spinner. Take your second disc and slide down the other side of the toothpick and glue in place.
- Snip off any protruding toothpick.
Your Fidget Spinner is now finished!
Printable DIY Fidget Spinner Instructions
You can now get your STEP by STEP DIY Fidget Spinner Instructions and TEMPLATES here in my Teacher’s Pay Teacher’s store!