Free Crochet Unicorn Pattern
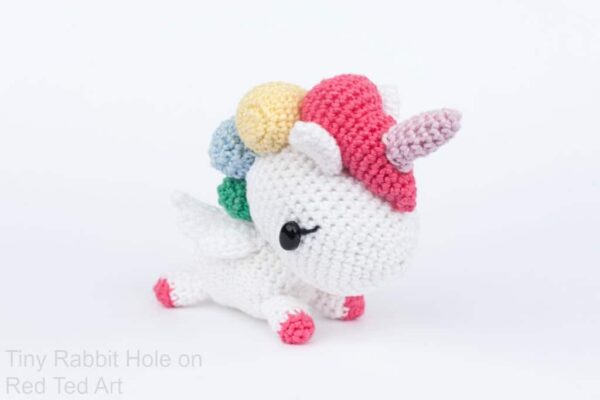
Welcome back! Our special Crochet Pattern Series (part of our Teach Yourself to Crochet program) continues with yet another GORGEOUSLY lovely Free Crochet Pattern for you. Today it is all about UNICORNS. You know how much we adore a Unicorn DIY! We have had Crochet Mermaids.. and it was time for a super duper cute Crochet Unicorn Pattern!
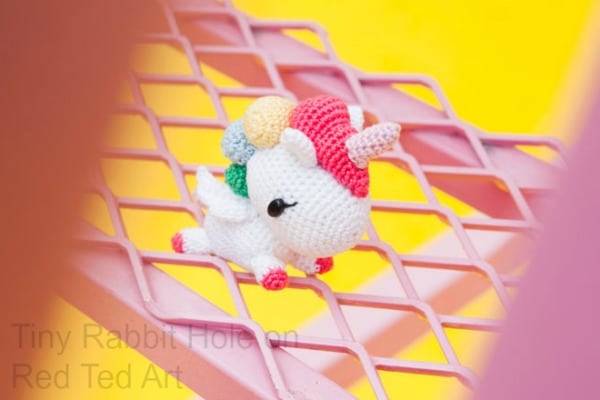
This is a super cute little unicorn pattern and perfect for anyone making to make a unicorn amigurumi. My daughter had a go at this unicorn DIY and it came out SUPER CUTE! You can have fun with the colors too and either go “plain” for the unicorn main or crochet it as a rainbow maine. Totally work with the materials you already have to hand. A lovely little toy or unicorn decoration! They would certainly make a lovely gift to unicorn lovers too. Of course, you can simply omit the unicorn horn and the unicorn wings and this then also makes a great little pony crochet pattern for horse mad children!
Free Crochet Unicorn Pattern
Today’s free unicorn crochet pattern is by Tiny Rabbit Hole. Tiny Rabbit Hole has amazing Crochet Kits – with lots of the cutest Amigurumi Patterns imaginable. Do hope over and take a peek here!
Crochet Unicorn Materials
- Patons 100% Cotton 4 Ply with 2.2mm 3/0 crochet hooks OR
- Crown 100% Acrylic 4 Ply with 2.4mm 4/0 crochet hooks
- (more info on colours and different yarns here)
- Polyfiber stuffing
- Yarn needle
- Stitch markers
- Sewing pins
- Beads/ toy eyes or embroidery thread
- Scissors
Yarns, supplies, and tools can be found here.
Crochet Unicorn – Abbreviations (US Terms)
st(s) stitch(es)
sc single crochet
inc increase
(do 2sc in the same st)
dec invisible decrease
(combine 2 sts into 1)
slst slip stitch
ch chain stitch
mc magic circle/ magic ring (learn how to crochet a magic ring here)
Crochet Unicorn Instructions
- Our amigurumi are mostly done in continuous rounds starting with a Magic Ring. You don’t need to end with a slip stitch. Do use a stitch marker to mark the last stitch of every round at all times.
- You may wish to download the Counter+ app to help you with your counting.
- Please crochet the stitches tightly to prevent the poly-fiber stuffing from showing. However, do not crochet too tightly, otherwise it’ll be difficult to continue.
- Be sure to push the washer down only the first screw of the safety eye, so as to prevent bulging.
- If you’re using a smaller washer, you have to push down twice.
- Always stuff your amigurumi firmly till the point that it feels bouncy.
- Always leave a long tail for sewing.
- When felting, ensure that the needle is perpendicular to object.
Crochet Unicorn PATTERN
Crochet Unicorn Head
Begin by making your unicorn corchet head! As mentioned before, you can have fun by customising the colours as well as adding rainbow features to the top of the head later (let’s make the head first!)!
Using yarn A
R1: sc 6 into magic ring………..(6sts)
R2: [inc] 6x……………………………(12sts)
R3: [sc 1, inc] 6x……………………(18sts)
R4: sc 18……………………………… (18sts)
R5: [sc 2, inc] 6x……………………(24sts)
R6: [sc 3, inc] 6x……………………(30sts)
R7: [sc 4, inc] 6x……………………(36sts)
R8-18: sc 36 (11 rounds)…….. (36sts)
R19: [sc 4, dec] 6x…………………(30sts)
R20: [sc 3, dec] 6x…………………(24sts)
R21: [sc 2, dec] 6x…………………(18sts)
Attach safety eyes between R11 and 12, 18 sts between eyes.
Start stuffing and continue as you go.
R22: [sc 1, dec] 6x…………………. (12sts)
R23: [dec] 6x…………………………. (6sts)
Break yarn and pull out the yarn tail.
Sew remaining stitches closed and weave in all ends.
Crochet Unicorn Body
Next it you need to make your unicorn body! Use the same yarn color as for the unicorn head!
Using yarn A
R1: sc 6 into magic ring………….(6sts)
R2: [inc] 6x……………………………. (12sts)
R3: [sc 1, inc] 6x……………………..(18sts)
R4: [sc 2, inc] 6x……………………..(24sts)
R5: [sc 3, inc] 6x……………………..(30sts)
R6-8: sc 30 (3 rounds)…………….(30sts)
R9: [sc 3, dec] 6x……………………. (24sts)
R10-11: sc 24 (2 rounds)…………(24sts)
R12: [sc 3, inc] 6x…………………… (30sts)
R13-15: sc 30 (3 rounds)…………(30sts)
R16: [sc 3, dec] 6x………………….. (24sts)
R17: [sc 2, dec] 6x………………….. (18sts)
Start stuffing and continue as you go.
R18: [sc 1, dec] 6x……………………(12sts)
R19: [dec] 6x…………………………… (6sts)
Break yarn and pull out the yarn tail.
Sew remaining stitches closed and weave in all ends.
Crochet Unicorn Ears (make 2)
Now your little unicorn will need some ears. You will need to make two of these crochet ears, again using the main body yarn color.
Using yarn A
R1: sc 4 into magic ring……………..(4sts)
R2: [sc 1, inc] 2x……………………….. (6sts)
R3: [sc 2, inc] 2x……………………….. (8sts)
R4: [sc 3, inc] 2x……………………….. (10sts)
R5-7: sc 10 (3 rounds)……………….(10sts)
Break yarn and pull out the yarn tail.
Do not stuff. Do not stitch up.
Crochet Unicorn Legs (make 4)
Time to make some the unicorn’s legs. And yes.. you will need four! I love that the legs have little “hooves”. So cute. The hooves can match the main or be doing in black or dark grey.
Using yarn B (or yarn G if using Crown)
R1 sc 4 into magic ring…………….(4sts)
R2 [inc] 4x………………………………. (8sts)
Switch to yarn A
R3 sc 8 (back loops only)………….(8sts)
R4-6 sc 8 (3 rounds)…………………(8sts)
Break yarn and pull out the yarn tail.
Stuff lightly. Do not stitch up.
Crochet Unicorn Wings (make 2)
If you are making a crochet horse, you can skip this part!
Using yarn A
*Leave a long tail at the beginning as you will need to tie the yarn tails on both
ends together after completing each wing.*
Make a foundation chain of 10 ch. Starting on the second chain from the hook, sc 9.
R1: Ch1 and turn, sc 7
R2: (Do not ch1) Turn, sc 7 starting from the first stitch
R3: Ch 1 and turn sc 5
R4: (Do not ch1) Turn, sc 5 starting from the first stitch
Crochet Unicorn Tail
Using yarn C
R1 sc 4 into magic ring…………..(4sts)
R2 [sc 3, inc]………………………….. (5sts)
R3 [sc 4, inc]………………………….. (6sts)
R4 [sc 1, inc] 3x………………………(9sts)
R5-6 sc 9 (2 rounds)……………….(9sts)
R7 [sc 1, dec] 3x……………………..(6sts)
R8 sc 6………………………………….. (6sts)
Cut yarn, and pull the yarn tail all the way through the last stitch. Stuff lightly.
Crochet Unicorn Front mane
Using yarn B
R1: sc 4 into magic ring……………(4sts)
R2: [sc1, inc] 2x………………………..(6sts)
R3: [sc 2, inc] 2x……………………….(8sts)
R4: [sc 3, inc] 2x……………………… (10sts)
R5: sc 10………………………………… (10sts)
R6: sc 3, [inc] 4x, sc 3……………… (14sts)
R7: sc 3, [sc 1, inc] 4x, sc 3……….(18sts)
R8-9: sc 18 (2 rounds)………………(18sts)
R10: sc 3, [sc 1, dec] 4x, sc 3…….(14sts)
R11: sc 5, [inc] 4x, sc 5………………(18sts)
R12: sc 5, [sc 1, inc] 4x, sc 5………(22sts)
R13-14: sc 22 (2 rounds)…………..(22sts)
R15: sc 5, [sc 1, dec] 4x, sc 5 …….(18sts)
Start stuffing and continue as you go.
R16: sc 5, [dec] 4x, sc 5………………(14sts)
R17: [sc 5, dec] 2x………………………(12sts)
R18: [dec] 6x……………………………… (6sts)
Break yarn and pull out the yarn tail.
Stuff generously. Sew remaining stitches closed and weave in all ends.
Crochet Unicorn First mid mane
Using yarn D
R1: sc 4 into magic ring……………..(4sts)
R2: [sc1, inc] 2x………………………… (6sts)
R3: sc 6……………………………………. (6sts)
R4: [sc 2, inc] 2x………………………… (8sts)
R5-6: sc 8 (2 rounds)………………….(8sts)
R7: [sc 3, inc] 2x………………………… (10sts)
R8: [sc 4, inc] 2x………………………… (12sts)
R9: [sc 5, inc] 2x………………………… (14sts)
R10: [sc 6, inc] 2x……………………….(16sts)
R11-15: sc 16 (5 rounds)……………(16sts)
Start stuffing and continue as you go.
R16: [sc 6, dec] 2x…………………….. (14sts)
R17: sc1, [sc 1, dec] 4x, sc 1………(10sts)
R18: [dec] 5x……………………………… (5sts)
Break yarn and pull out the yarn tail.
Stuff generously. Sew remaining stitches closed and weave in all ends.
Crochet Unicorn Second mid mane
Using yarn E
R1: sc 4 into magic ring………….(4sts)
R2: [sc1, inc] 2x………………………(6sts)
R3: sc 6…………………………………. (6sts)
R4: [sc 2, inc] 2x……………………..(8sts)
R5-6: sc 8 (2 rounds)………………(8sts)
R7: [sc 3, inc] 2x……………………..(10sts)
R8: [sc 4, inc] 2x……………………..(12sts)
R9: [sc 5, inc] 2x……………………..(14sts)
R10-13: sc 14 (4 rounds)………..(14sts)
Start stuffing and continue as you go.
R14: sc1, [sc 1, dec] 4x, sc 1…..(10sts)
R15: [dec] 5x……………………………(5sts)
Break yarn and pull out the yarn tail.
Stuff generously. Sew remaining stitches closed and weave in all ends.
Crochet Unicorn Last mid mane
Using yarn F
R1: sc 4 into magic ring…………(4sts)
R2: [sc1, inc] 2x……………………..(6sts)
R3: sc 6………………………………… (6sts)
R4: [sc 2, inc] 2x…………………….(8sts)
R5-6: sc 8 (2 rounds)……………..(8sts)
R7: [sc 3, inc] 2x…………………….(10sts)
R8: [sc 4, inc] 2x…………………….(12sts)
Start stuffing and continue as you go.
R9-10: sc 12 (2 rounds)…………(12sts)
R11: [dec] 6x………………………….(6sts)
Break yarn and pull out the yarn tail.
Stuff generously. Sew remaining stitches closed and weave in all ends.
Crochet Unicorn Horn
Using yarn C
R1: sc 4 into magic ring…………(4sts)
R2: [sc 1, inc] 2x…………………….(6sts)
R3: sc 6 ……………………………….. (6sts)
R4: [sc 2, inc] 2x…………………….(8sts)
R5-6: sc 8 (2 rounds)……………..(8sts)
R7: [sc 3, inc] 2x…………………….(10sts)
Break yarn and pull out the yarn tail.
Stuff lightly. Do not stitch up.
Crochet Unicorn Assembly
- Assemble tip of body to base of unicorn head
- Secondly, stitch all the manes to the unicorn head starting from the front mane.
- Thirdly, stitch the unicorn horn to the front mane
- Next, stitch the ears to either side of the unicorn’s mane
- Stitch the legs to all corners of the unicorn body, with hooves pointing outwards
- Stitch the tail to the unicorn’s bottom
- Finally, stitch on the wings to the unicorn body
A huge thank you to Tiny Rabbit Hole for sharing this adorable Unicorn Crochet Pattern with us!! I hope you have enjoyed it as much as we have and that you hop on over and pay them a visit!
You may also LOVE this Mermaid Crochet Pattern:
Cutest Kawaii Avocado Crochet Pattern:
More wonderful Unicorn DIYs here:
Check out all our Free Crochet Patterns here:
Copyright
Note: Red Ted Art has been given explicit permission to reproduce this content.
Tokidoki is a Japanese-inspired lifestyle brand created by Italian artist Simone Legno, together with business partners Pooneh Mohajer and Ivan Arnold. The creation of Stellina is inspired by tokidoki and the amigurumi pattern was created by Angie Ng of TinyRabbitHole.com. All our patterns are copyrighted to Tiny Rabbit Hole and are for personal use only. The patterns (in whole or in part) may not be reproduced, distributed or resold, translated, published, altered, shared or posted (for sale or free) over the Internet or offline.
Any image(s) of a product based on this design, be it digital or physical, whether 100% accuracy or with slight modification, produced in past or present, credit must be given in the following format: “Pattern and design by Angie Ng of TinyRabbitHole.com” and tag @tinyrabbithole on Instagram if the aforementioned image(s) are shared on Instagram.
You may place a link to this pattern from your site, but please do not repost it on your own page . For more information on the copyright policy, please click here.


