Easy Salt Dough Keepsakes – Shell Pendant
Today we have a great and easy Summer Crafts for Preschoolers idea. We love making homemade salt dough and today we combine this with our summer nature finds. Turn your Sea Shell finds into super easy Salt Dough Shell Pendants.. a lovely holiday keepsake that toddlers, preschoolers nad kids can make! How we love 20 sea shell crafts!

One of Pip Squeak’s favourite things is to collect SHELLS – LOTS of Shells. Every seaside we go to, she immediately sets off on a sea shell hunt – any size, big shells or small shells. Whole shells. Or broken shells. When we come home, she plays with the shells. Sorts them. Stacks them. Puts them in boxes. Takes them out of boxes… and asks me what we can MAKE with her shells.
We alread made a prett sea shell mobile (great for those broken shells) and have a lovely 20 shell crafts round up, showing our shell crab fridge magnets.
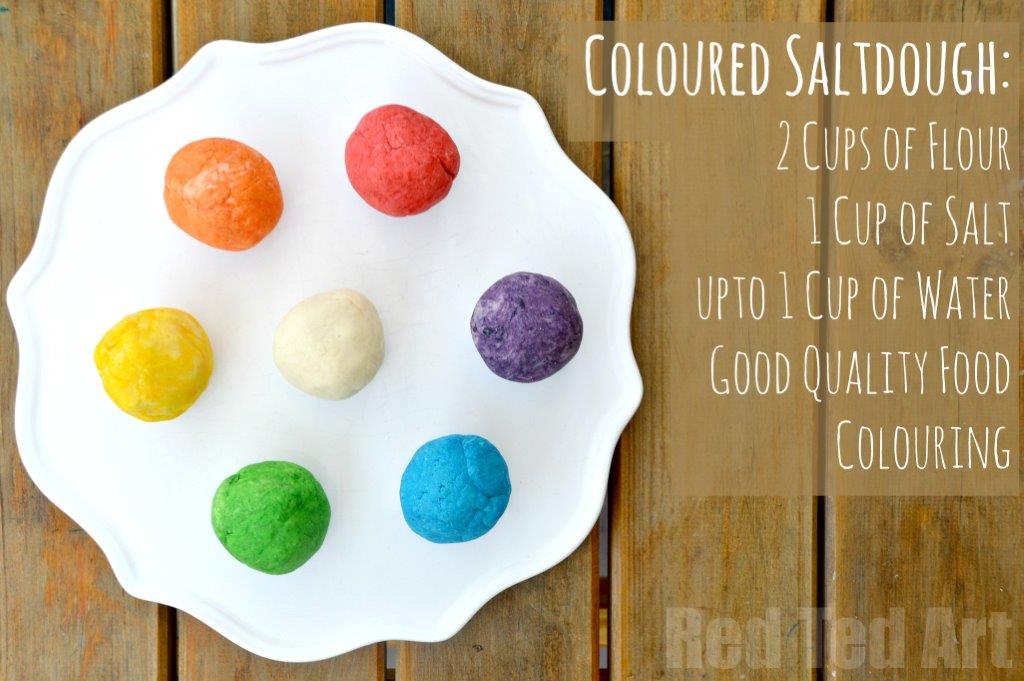
Today, we share our sea shell pendants – so quick and easy to make using our favourite coloured and EASY salt dough recipe. The coloured salt dough recipe is really quick and easy to make – they key is to try out different food colourings or different paints… we share what we like to use below!! (We have lots of lovely easy salt dough projects for you to explore).
You may also like these adorable Salydough and Sea Shell Turtles:

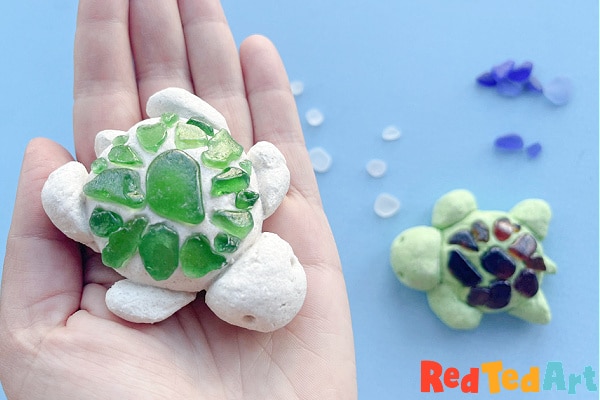
Similarly, you may love our Sea Glass Turtles:
Sea Shell Pendant Salt Dough – materials:
- Small shells (whole or broken)
- 2 cups of flour
- 1 cup of salt
- UPTO 1 cup of water
- Food colouring or paint (we added a genrous knife tip of good quality food colouring gel)*
- a tray
- a muslin cloth to keep the saltdough damp if working in the Summer and outdoors
* we love using Sugarflair Food Colouring – get them in US here & in the UK here (affiliate links)

Sea Shell Pendants – Coloured Salt Dough How To:
Check out our easy to follow Salt Dough Video Tutorial.. or follow the step by step instructions below!

1) Begin by mixing your salt dough. Mix flour and salt and then slowly start adding your water. We added about half to 2/3s of the water to get basic salt dough mixed. Then divided into 7 portions. Add a generous amount of food colouring. Good quality will show up better once dried – we used a food colouring gel – get them in US here & in the UK here (affiliate links). If you use “lower quality”, add more colour and/ or you MAY have to varnished your finished product. When mixing in the food gel – you MAY get purple or red hands… do wash them inbetween mixing colours to avoid cross contamination. Also, if you knead your colour in, work on a surface that can be wiped clean of colour if need be!

2) Get your shells ready.

3) Form little balls of salt dough. If it cracks, add a little water. Flatten it a little and press in your shell.

4) Make a hole for hanging with a chopstick or similar. Make sure the hole is not too close to the edge, as it can break later.

5) Let dry – turn a few times. We had a lovely hot Summers days.. so it dried by the end of the day. In Winter, I would put the salt dough in the oven at low heat (80C) and turn every 10-15min. Also be sure to “repoke” your hanging holes. As salt dough can spread and these can shut. The shells should stay securely.. if not, you can always glue them in place afterwards!

6) If you are working on a hot day, keep your salt dough under a damp cloth to avoid it drying out.
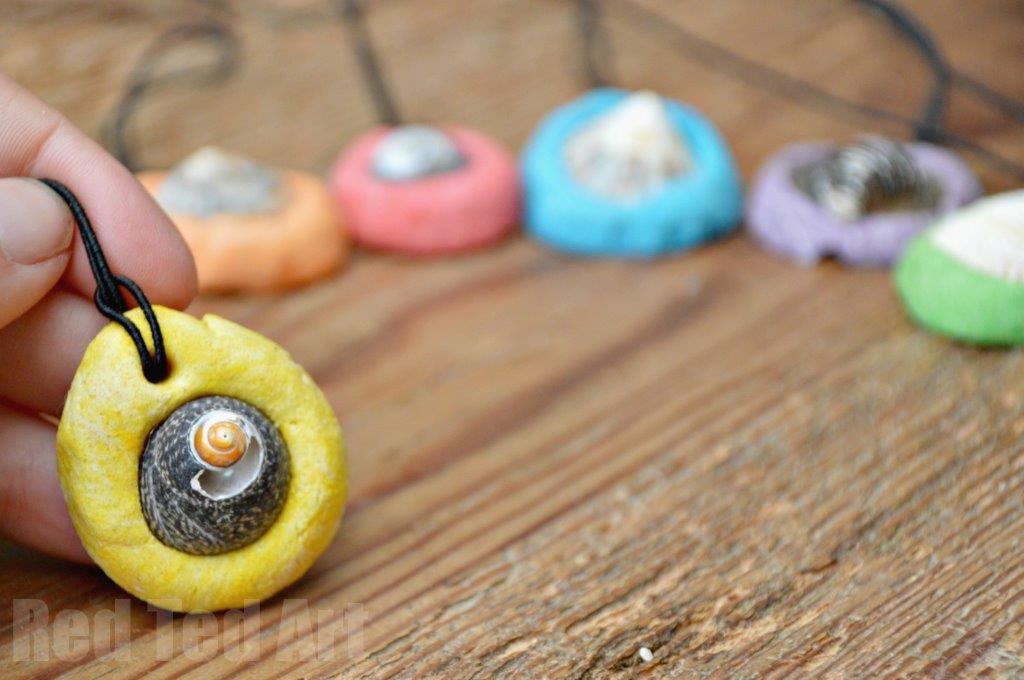
7) Once dry, thread up your shells and you are ready to wear your sea shell pendant!

And wear!! (the kids were wearing theirs all day… but wouldn’t let me photograph them). I LOVE these little sea shell pendants. I think they are so simple, so cute and SO EASY to make. Great gifts for an auntie or a friend too!
You may also like these adorable Salydough and Sea Shell Turtles:
With many more great summer salt dough craft ideas here:

Check out our other 20+ sea shell craft ideas:

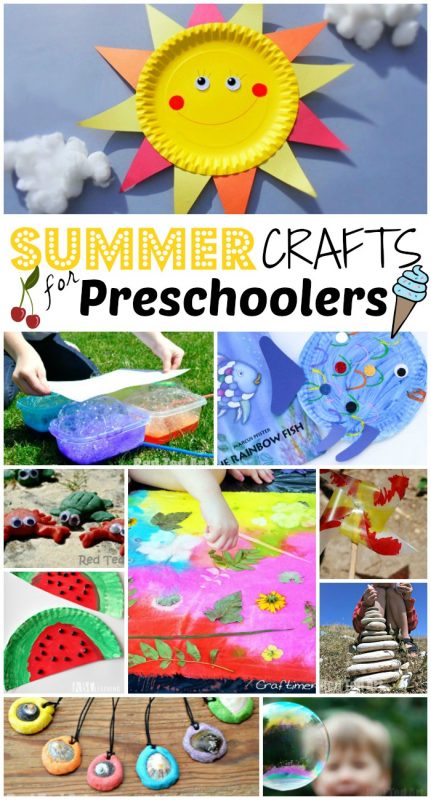
Why not check out the rest of our Summer Crafts for Preschoolers?