
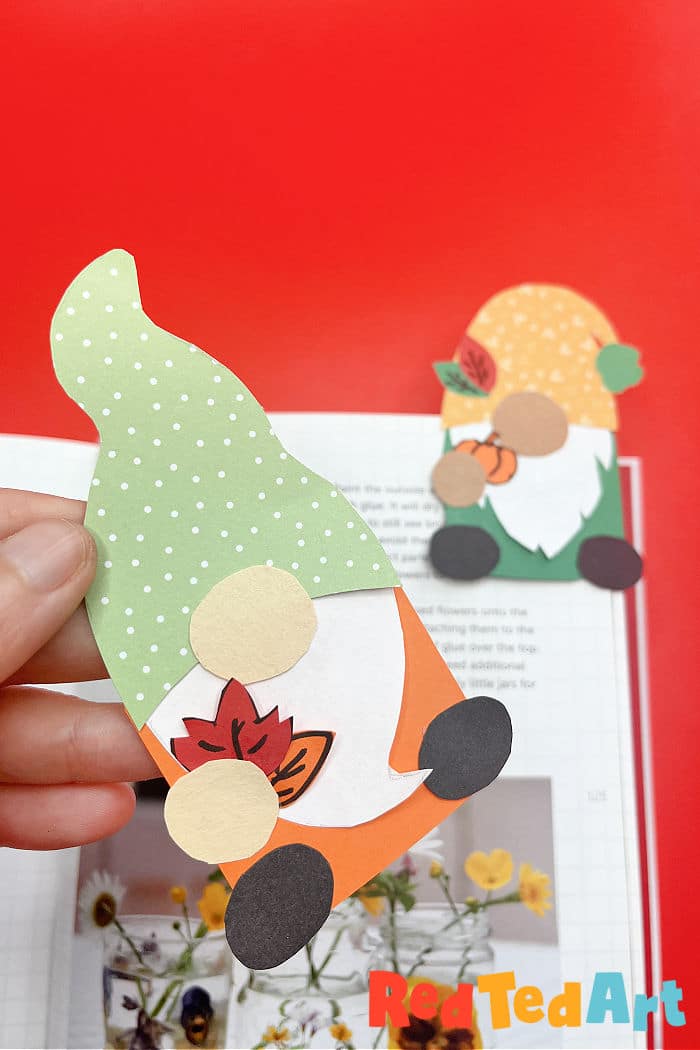
Fall Gnome Bookmark Corner
The corner bookmark design fun continues as we head into fall! And what could be more fun, than super duper cute Fall Gnome Bookmark Corners??! Needless to say, these adorable gnomes, could be made to suit any season (watch out Christmas Gnomes.. here we come), but I thought I would start things off with the fall gnomes!!!
As with all my corner bookmark designs, I encourage you to follow my step by step instructions to create your very own gnome designs. However, on this occassion, I also created a gnome bookmark template! Perfect for students and working in the classroom or at an event – be it a church or in a library.
The gnome bookmark template includes the bookmark origami base shape, two basic gnomes AND some little gnome accessories for – Fall, Christmas, Halloween and Valentines! Woohoo!
Love gnomes? Want to see are full set of Gnome Crafts.. then read on!

To make your Sloth Bookmark Corner you will need:

We went for “traditional” fall colours of orange, yellow, red and green. But you can easily make this gnomes any colour you want, to suit any seasons! Pastels, pinks, purples or blues! Your call! You can also use white paper to make these paper gnomes bookmarks and simply draw and colour in your own gnomes with marker pens. Work with what materials are available to your students and kids!
- main gnome body colour – 10cm x 10cm (4 inch x 4 inch) – note – this is a small bookmark size than we have used so far. It is basically a sheet of A6 paper cut down to a square! Our printable, has the perfect square size to fit our gnomes
- small pieces of construction paper or pretty patterned craft paper for gnome features – including beard and skin tone of choice
- Pencil and rubber for sketching shapes (if not using our templates)
- Black marker pen (for adding details to fall accessories if not using out templates)
- Scissors
- Glue stick
Time to make this fall gnome paper bookmark for your animal loving bookworms!
If you are interested in grabbing the gnome template, it comes with a few simple (!) accessories suitable for Fall, Thanksgiving, Christmas, Halloween, and Valentine’s Day – by switching the colours of your gnome’s body and your gnome’s hat, you can also make it suitable for different seasons. The accessories are simple: leaves, pumpkin, gift, candy cane, cauldron and broom. Students are encourage to think of other accessories and add to their designs! By purchasing these worksheets and printables, not only do you get classroom friendly print outs, but you also help support the upkeep of this website. THANK YOU! You can grab this printable pack on either Gumroad or Teacher’s Pay Teachers.

How to make a Fall Gnome Corner Bookmark
Begin by making your basic origami bookmark corner – this is the basic corner bookmark that we use for ALL our Corner Bookmark Designs – so fun and so versatile!
I actually ended up making a video of both the gnomes! One is on auto play and one you can see above. Essentially, they are the same craft and process. But I couldn’t resist because they are so fun to make!

Basic Origami Corner Bookmark
First you will need to make a square out of your paper. Corner bookmarks need squares of paper, but here we show you how to create that perfect square!! As mentinoed, for the gnomes, we used a smaller sheet of paper – 10 cm x 10 cm – effectively cutting down a sheet of A6.
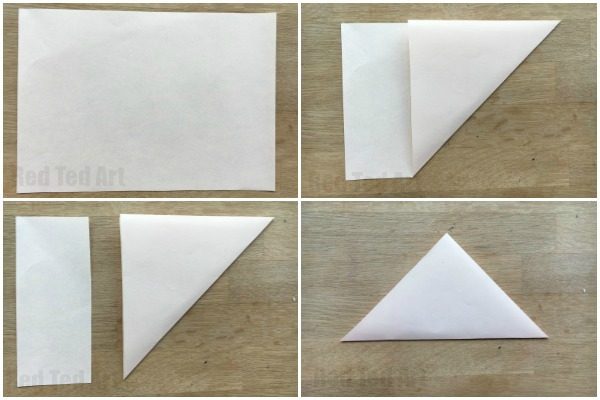
- Take your A5 sheet of paper and fold over one corner to create a triangle.
- Cut off the excess and rotate your triangle so the long edge is at the bottom and the right angle faces up. Make sure the top of the triangle is looking up and you have the long edge running perpendicular.
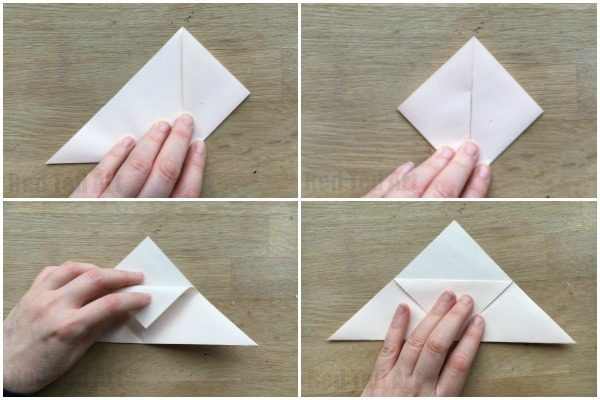
- Fold the lower right corner up to meet the top right angled corner.
- Repeat for the left side.
- Fold these two back open.
- Flip down ONE of the top sheets and crease.

- Now fold the flaps you created back up and tuck INTO your bookmark.
- Repeat for the other side
- Congratulations, you have just created your basic Origami Corner Bookmark!
Decorate the Bookmark as a Gnome
Create the Gnome’s Hat, Beard and Nose
Your gnome will need the following key features:
- Hat,
- Beard,
- Nose
- In addition – you can add, feet, a hand, accessories – but they aren’t strictly speaking necessary!

Begin by sketching out the gnomes hat. I placed my pretty craft paper, over the top of the finished bookmark, to get a feel for size – you want the gnomes hat to be ever so slightly bigger. Alternatively, trace the shapes I have provided in the template.
Once you are happy with the hat sketch, cut it out. I created two gnome hat designs, one floppy gnome hat and one wiggly gnome hat. I love using pretty craft pattern, so your gnome has a fun hat pattern too! But you can use plain paper and decorate it if you prefer!

Now you can cut a nose – the nose is simple – just a circle – play around with the size if you wish.
Once you have your hat and nose ready. Use the hat size, to help you sketch out the gnome’s beard. Start of simple at first, with an almost triangluar beard shape, then add some little quiffs to shape it. Make sure the beard includes a little “extra” so you can stick it to the back of the hat.

Cut out the beard.

Here are the shapes for my second gnome, including a pom pom for the hat!

Check that the hat, nose and beard fit nicely on your bookmark corner. If you are happy with all the sizing, glue the beard to the back of the hat. Glue the nose on top of the beard and hat. And then glue on to your corner bookmark – make sure it is positioned, so that the bookmark fits over the top right hand corner of your book.

Cut some oval feet and glue in place.
Create your Fall Gnome’s Seasonal Accessories

Now it is time to have fun with fall accessories! I decided to cut out some little leaves for the gnome’s hat, a bigger maple leaf for him to hold, as well as a small pumpkin!

But any accessory goes! Experiment and have fun!
Once you are happy with these, cut a circle for a gnome’s hand.
Glue the hand and the accessories in place.
Your Autumn Gnome Bookmark Corners are finished! Aren’t they fun!!?
Now as mentioned, these would look great for ALL the seasons. I can’t wait to make some Christmas Gnome Bookmarks too!
More awesome Gnome Crafts here:

Ready for some more Fall Bookmark Designs – try out these fun paper crafts:

