
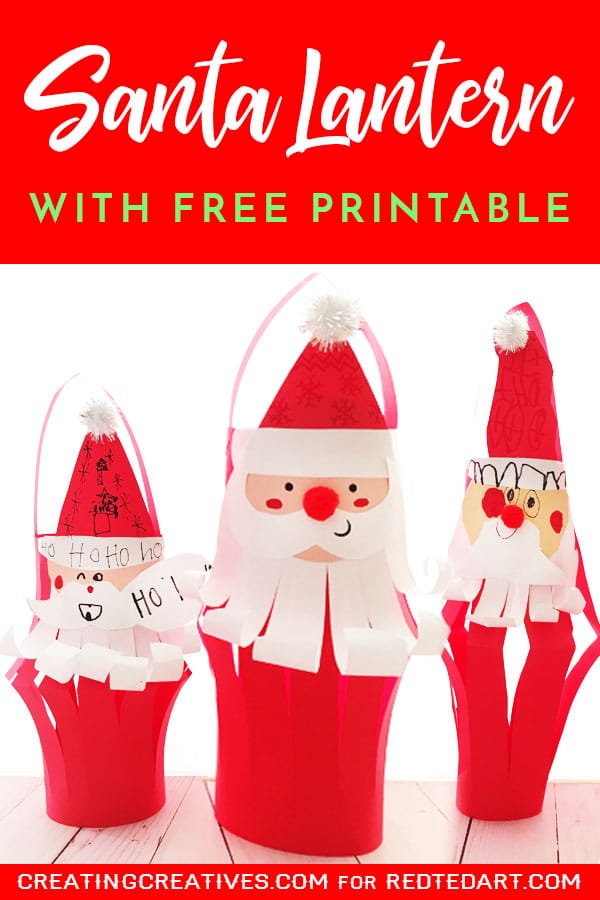
Paper Lantern Santa Craft for Kids
Looking for a nice and easy Paper Christmas Craft for Kids?! Look no further. Our guest writer Creating Creatives is BACK! Love this take on the “classic” paper lantern, which is so fun to make and how she turns it into this fabulous Paper Santa Lantern.. add a tea light or string them up as a paper Santa Lantern.. either way, they are just the cutest! And the best bit? They come complete with free template for extra easy making. These would be great for both preschoolers and older kids. Over to Creating Creatives!
Paper Lantern Santa Craft for Kids
See all of Creating Creatives guest posts on Red Ted Art here!
These Santa Lanterns would look great as Santa ornaments in the Christmas Tree.. or would also work really wall as a Santa Garland.
On to our Paper Christmas Decoration Santa
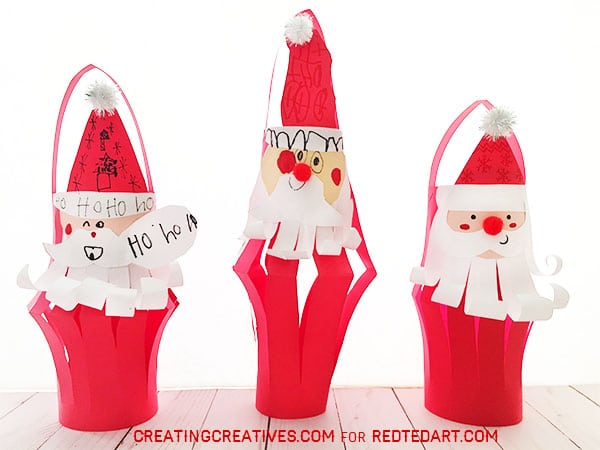
Happy Christmas Tedsters! We’re back and we’ve brought a friend, Jolly Ol’ St. Nicolas! My kids and I had such a lovely time making these sweet Santa Paper Lanterns and we hope you will too!
As always if you decide to give it a go we’d love to see how they turn out so feel free to tag me on Instagram @creatingcreatives.
Paper Santa Lantern – Supplies:
- 1 Piece of Red Paper
- 1 Piece of White Paper
- 1 Piece of Skin Colored Paper
- Black & Red marker
- Red Pom Pom for nose & White Pom Pom for hat
- Scissors
- Stapler
- Glue
(To get this download as a freebie, simply add $0 at check out)

Extension idea: if you do not want to use the templates provided, you could make a “classic” handprint santa face and add that to your paper lanterns too. How adorable woudl that be? This would be especially lovely if working with toddlers.
How to make a paper lantern Santa for Christmas
What our Paper Santa Lantern video on auto play or follow the step by step instructions today!
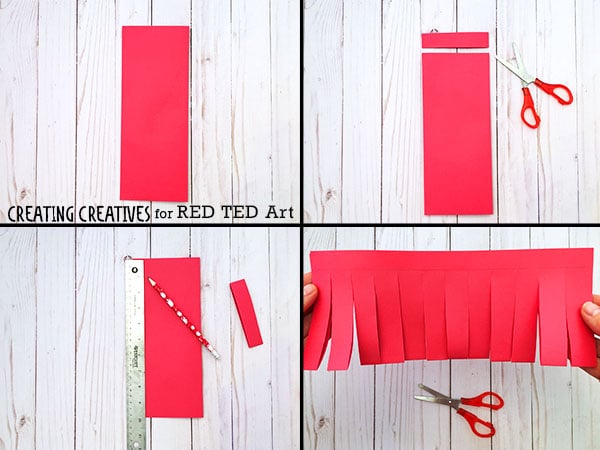
Begin with your classic Paper Lantern
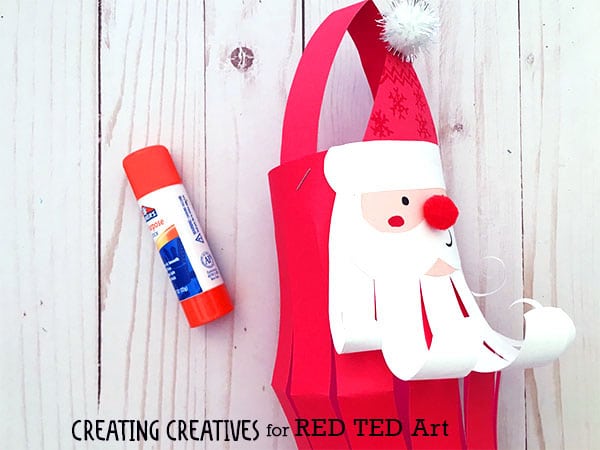
Fold your red paper lengthwise and fully cut a section off from the top, this will be the handle. Draw a line about ½” (1-2cms) from the edge of the long side of the folded paper, opposite the folded side. This will be the line where you stop cutting. Cut slits all along the folded side.
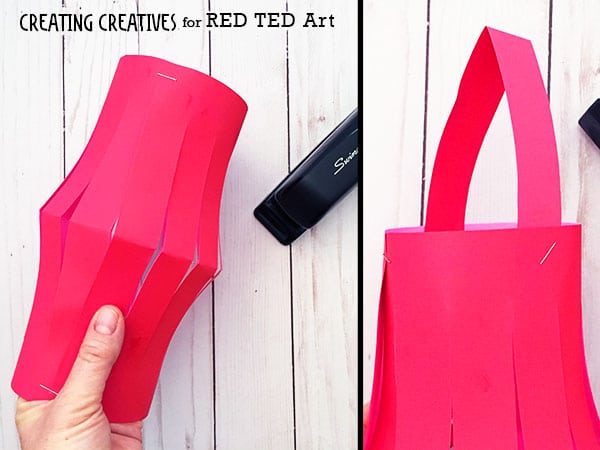
Open up your paper, and match up the long edges on the top and bottom to form a lantern shape. Tape or staple them together. Then staple your handle strip to the top
Time for Santa’s Paper Face
Now it’s time to cut out the Santa Face pieces: circle face, mustache, hat brim and hat triangle. You can do this from our printable, or free hand. If you’d like to do it free hand here’s what we did.
- Santa Face – Trace around a coffee cup on your skin colored paper and cut it out.
- On your white paper trace around your coffee cup with a light stroke, then draw in your mustache and hat brim and cut them out. You can see how we drew ours in the picture below.
- Cut out a red triangle hat to fit your hat brim.

Glue all your pieces together. Once they’re glued you can glue on your pom pom nose and santa hat bobble, then add in face details with your black and red markers. My kids also added some hat decoration, which I think adds so much personality! If you don’t have pom poms to hand, you can always use cotton balls for the santa hat bobble and a simple red paper cut out for the nose.

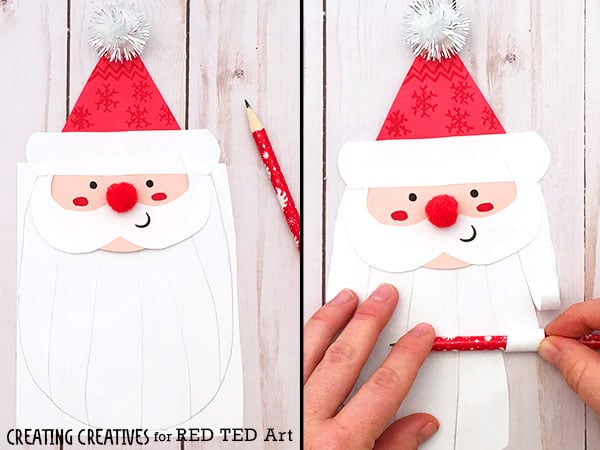
It’s time to make the beard. Lay your Santa face on some white paper and draw a long beard shape. Make sure the shape goes all the way up to Santa’s hat, then cut it out.
Then, draw some lines from the bottom of the beard all the way up to just past Santa’s face then cut along the lines.
Take a pencil and curl the paper around the pencil to make his curly beard, then glue the beard to the back of his head.
Once your pom poms have dried glue your Santa head onto your lantern, lining up the top of Santa’s brim with the top of the lantern.
Variations for the beard: white yarn would look super fun too, or you could use cotton balls.. or alternatively, as mentioned before, add some handprint santa beards!
You’re done! Easy pasy! Now it is time to hang and enjoy!

Such a lovely santa craft for kids of all ages to enjoy!
More fabulous inspiration by Creating Creatives:
Looking for more Christmas Paper Crafts for Kids…

Also check out the remaining Easy Santa Crafts here on Red Ted Art and be sure to make some this holiday season!

