
Fun with DIY Paper Easter Gnome Cones (free template!)
So we do rather love a DIY Gnome here on Red Ted Art and have made a number for you over the years.. what makes a DIY Gnome a gnome for a specific season? Specifically, what makes a gnome craft an Easter Gnome? Let’s find out with our super duper cute Paper Easter Gnome Cones!

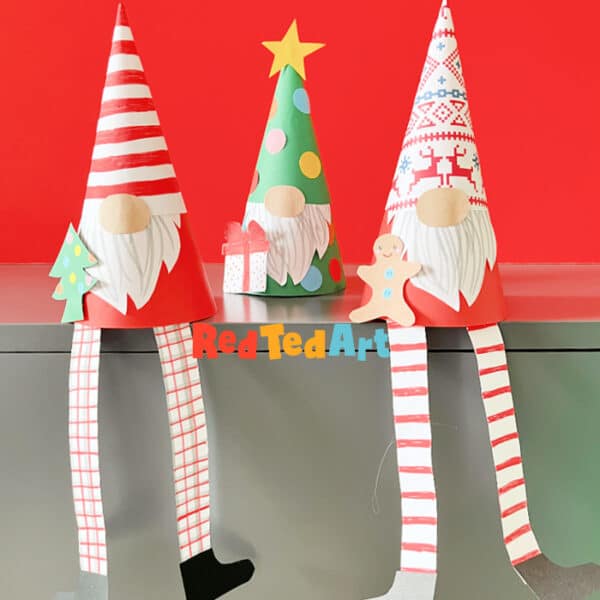
Aren’t they adorable? Fans of Red Ted Art, will know, that these are part of our Halloween Gnome and Christmas Gnome series. All you need is one basic printable add your creative magic.. and hey presto – paper cone gnomes for all seasons:

How to make an Easter Gnome DIY
So.. Before I start on specific Easter Gnome Crafts and links. What makes a gnome and Easter gnome? The answer is pretty easy:
Easter Colours or Spring Colours
Colours are everything when you are doing seasonal crafts. For Easter, you will need either:
- A pastel pallet or
- Yellows, greens, light blues, pinks etc
Easter Gnome Features
Then you will also need your Easter features – so think cauldrons and bats for Halloween.. what are the Easter equivalents?
- Bunny ears (big must)
- Daisies and flowers
- Easter eggs and basket accessories
- Spring animal “pets” or side kicks
- Carrots
So.. if you focus on these Easter gnome features.. you can take ANY generic gnome craft (ideally with templates) and turn it into an Easter Gnome DIY.
My Gnome Crafts with Templates
As mentioned, I have created a number of paper gnome templates for you in the past.. you can take any of these, switch out the colours and add some seasonal details.. and hey presto you have your Easter Gnomes!
- Paper Gnome Cone (though you try making these with felt too!)
- Pop Up Gnome Card
- Gnome corner bookmarks
- Ornament Felt Gnome templates
- Gnome Suncatchers
Paper Easter Gnome Shelf Sitters – Supplies
I waffle a lot in this list of craft supplies needed to make these adorable gnomes.. but it is simple: you need PAPER!!!! And that is more or less it:
- Paper card stock or construction paper in desired colors – for each gnome you need half a sheet of paper for the body and half a sheet of paper for the hat – especially if you cut carefully. If you cut carefully, you can get two bodies out of one sheet of paper. Then you will need some paper scraps of you want to add extras!
- White printer paper to cut your templates. But the shapes are very basic – and you can use a plate to trace your own – just read my instructions
- Alternatively: urse our Paper Gnome Coloring Page (Get it part of the Christmas Gnome set) and just use one sheet of white paper and some markers to color it in!
- Scissors
- Glue stick (no hot glue gun needed! Extra safe for the kids to make)
- Coloured felt tip pens (for embellishments)
For these Spring Paper Cone Gnomes, I haven’t added any “additional” printable features.. so all you need is the FREE basic paper gnome. Simply add $0 at check (or leave a small tip if you wish, always super helpful and appreciated). Or buy the Halloween/ Christmas/ Basic bundle and make the gnomes for all seasons!


Paper Cone Gnome Coloring Page

I just quicly wanted to highlight the very simple 3d Paper Gnome Coloring Page (Get it part of the Christmas Gnome set). This is designed for those of you who want to have a go, but either don’t have time to cute as many shapes (not that you need to cut THAT much out) or don’t have as many construction paper colors.
This would be ideal with markers or coloring pencils or even water colors! Though if using the latter, I recommend printing on light card stock to avoid “curling” of your Gnome Shelf Sitter. This is available as part of the bundle on sale in Teachers Pay Teachers.

How to make a paper gnome for Easter or Spring
Check out the video tutorial on autoplay for the step by step paper cone gnome assembly! You will see how easy these are to make! Please note – the video tutorial is our HALLOWEEN Gnome design. But the process is EXACTLY the same for our Easter gnome. You simply have to switch out the colours and of course add seasonally themed embellishments for Easter – we cut out some paper bunny ears, a paper carrot and added blue daisies to the gnome hat!
Cut your basic gnome shapes in Easter colors
My work experience student had a go at making these Easter gnomes for us! Didn’t she do a great job. Take a look here:
MAKE YOUR OWN DIY Cone Gnome Template: If you are making your own template, find a large circle to trace (serving plate?) and cut out just over a quarter. You will then need to add a little tab for gluing). The gnome had is basically the same just a smaller circle with the same angle in the cut. The beard you may have to sketch a couple of times, but experiement, I know you can do it. The nose is an oval, the legs or long socks are rectangles.. then sketch some simple shoes!

If you cut carefully, you can make two gnome bodies out of one sheet of paper. Cut shapes for 2-3 gnomes in one go to save a little time!

Add some decorations to your paper cut outs – e.g. add detail for the gnome beard to “pop”, as well as fun embellishments to the gnome hat, body and legs… You can see in our finished Easter gnome photos.. that we cut out white polka dots for one of our gnomes and drew blue daisies for the other. The centre of the daisies was cut using a hole punch.
The beard was decorated using a grey marker pen. Super simple! I am sure a pencil would work too. Of course you leave the beard white! The grey just allows this Easter gnome’s beard to really pop!

Roll up the cones. Then unroll and add glue to the tab for sticking. (Photo used from our Christmas Gnome).
It can be a TINY bit fiddly – but don’t worry, the back doesn’t have to be too neat. Your shelf sitter gnome, will always be looking foward, so no one can see the back.
Glue both the gnome’s hat cone and the body cone. (I like to stick the tab on the inside of the cone, if sticking it to the outside is easier, please do that!).

Add glue to the top of the gnome’s beard and stick inside the gnome’s hat. I made the beard quite generous, so you can adjust it. Just make sure it isn’t “too long” for the gnome’s black body. So check before securing it. (Christmas Gnome Photos used)

Add a little glue to the back of the beard… (Christmas Gnome Photos used)

…and pop over the gnome’s body cone. You don’t need a lot of glue, just enough to secure it. Glue the gnome’s nose in place… (Christmas Gnome Photos used)

… the basic 3d paper gnome is finished! To be honest, if you ONLY made this, you still have the most adorable Spring Gnome Decoration! But alas.. we will add the dangly legs. First by gluing the shoes/ boots on the bottom of our feet. And now you will have a Gnome with legs to sit on a shelf.

Finally, we revisited our Easter embellishments.. and played around with different sizes bunny ears, a number of paper carrots, a large paper daisy and look at different ways to decorate the gnome hat’s and bodies.. in the end we settled on (as mentioned):
- Blue daisies with hole punch centres for gnome 1
- Bunny ears for gnome 1
- Dots on the gnome 1 legs
as well as:
- Paper polka dots for gnome hat of gnome 2
- Some bold stirpes on gnome 2’s body
- A little paper carrot

Ta-daaaa! And finished!

As with all our paper cone gnomes, you can display these as shelf sitters with the long dangly legs. or fold the legs inside the gnome (or omit them altogether) to simplye make cone gnomes – if making gnome gnomes.. I think they would make adorable party hats too!
See all our Paper Easter Crafts to have a go at this March and April. March crafts at their best:

Or why not check our collection of DIY Gnome Crafts – and see which crafts you can customize for Easter and spring:
