Easy Pop Up Dog Card
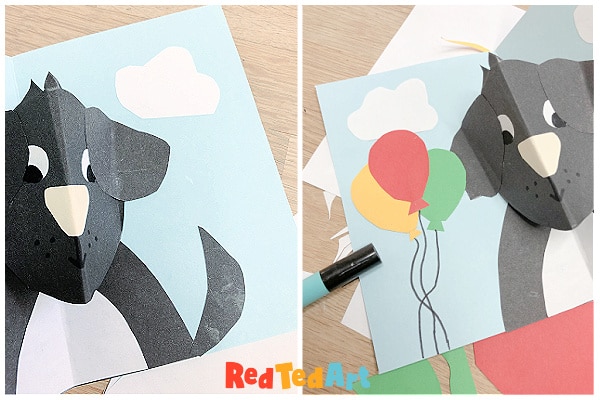
My my my my, we really have had a lot of recent Birthday’s here at Red Ted Art HQ recently. And with birthdays, come Handmade Pop Up cards! This time we had a Dog Lover’s Birthday so my 11yrs old decided to make her a Pop Up Dog Card using our trusted W pop up method! She decided to take step photos for you along the way.
To make your Pop Up Dog Card you will need:
- Card stock (we used A5 folded in half)
- Paper in desired dog colours (we used black and white, with a little beige for the nose + some scraps for balloons)
- Scissors
- Pens
- Glue stick
How to make a pop up dog card
As mentioned this craft was made and designed by my 11yrs old daughter. So we didn’t film the process – we do however have a W Method Snowman Pop Up card which follows the same steps – and we put that video on auto play for you! So you can use the combination of the video you can see in side bar OR follow the steps below! Though of course this isn’t a Christmas card, but a handmade birthday card.
Cutting your paper dog shapes
NOTE: in terms of “the right size” to make your pop up puppy – we always find that the pop should be able to fit “flat” on the front of the card. So in our case, our paper puppy should not be bigger than A6. This allows the pop up to fit nicely inside the card and not stick out. It also gives you space for adding embellishments and a birthday message.
Top Left Photo: Using something circular (like a glass), trace a circle for the dogs head and add two little hair bits to the top, as well as two tabs to make it easier to stick the ears etc on later (the tabs aren’t strictly speaking necessary..).
Top Right & Bottom Left: cut out the other dog features – such as big floppy ears, eyes and a nose.
Bottom right: Assemble your dog features – glue on the eyes and nose – add details in pen. Glue on the ears. (SO CUTE!).
Making the dog’s body for the pop up card
Cut out a dog shaped body. My daughter chose to do “a flat U” shape.. and then cut out a white bit for the front of the body and glue together.
The body of the dog, won’t pop out, but is glued flat. So fold in half (with the white bit on the inside) and glue on yout card, with the fold alinging with the fold of the greeting card.
Making the paper dog head pop up
Now to make that “famous” W shape for the pop up. Fold the dog face in half – with thea reatus on the outside.
Fold the ears in the opposite directions to make “flaps” that you can then glue down (the tabs you made earlier will give you an additional surface area for gluing too, but as mentioned these aren’t strictly necessary, gluing the flap of the ear is plenty). When you look at the side of the dog, it will look a bit like a W.
Add glue to these “flaps” and stick only these down into your card.
Now add any embellishments such as the puppy’s tail, clouds, balloons or trees!
Your pop up dog card is finished! Isn’t it adorable?
More fabulous Pop Up Card Projects here:
Fabulous Dog Crafts for Kids:


