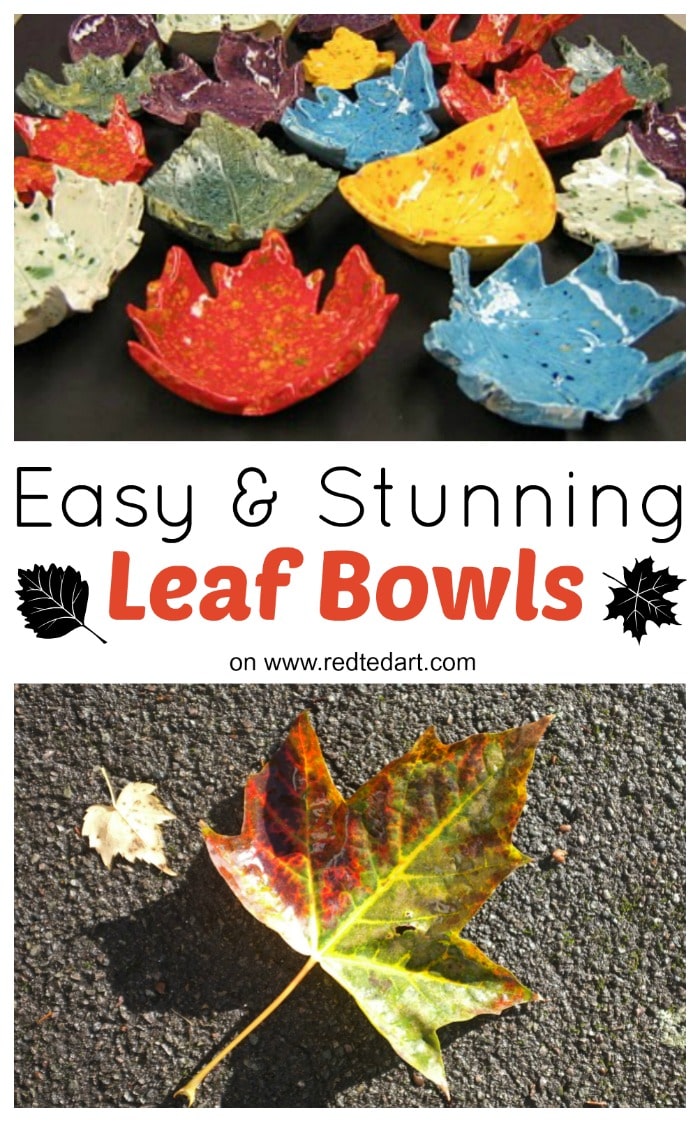
Learn how to make leaf bowls with air drying clay, fired clay or even salt dough. This is a great Autumn Crafts for Kids, but this great Leaf Craft can be made all year round.
They are great Christmas Gifts Kids Can Make too! This is a guest post from Lori at Fun Art 4 Kids -she simply the most amazing kids craft blog.

Lori comes up with so many different fabulously cute ideas and sorts them by age groups, which makes it a really handy reference blog. PLEASE do go and take a look! She has VERY kindly agreed to share these FABULOUS leaf bowls with us. Although she says that these are for 4th graders, I think that these are for any age group. I simply adore them!
You may also like these fabulous Clay Leaf Magnets – great as a Thanksgiving decoration or small gift idea.
ALTERNATIVES to KILN:
Stock up on Air Drying Clay: US readers / UK readers (aff links)
- Lori suggest making them in a Kiln (as per the instructions below), but we had a go with airdrying clay (see our version at the very end of the post), it does mean that they are more fragile and the final “look” is different, but you can have a go at home!!! I followed the instructions below. Let air dry for 3-4 days, painted it with acryclics (with Red Ted) and used an acryclic varnish for sealing. This makes it ornamental, rather than for use with food.
Stock up on Air Drying Clay: US readers / UK readers (aff links)
2. You can also make these using salt dough! Yes, salt dough. But remember that salt needs to dry a long time!
Whilst I have your Attention
All crafts supplied on this website are free for you to follow and read. Occassionally, I charge for the odd template, but the templates are not necessary for crafting! During this super uncertain time of Covid, if would like to show me additional support, there are number of ways you can really help me (and help continue with this free resource website!!):
- Follow me on YouTube (I am soooo keen to hit that 1mill subs milestone!)
- Sign up to my FREE weekly newsletter
- For Preschoolers – follow my FREE FB Group or join this newsletter
- Or if you wish, you can buy me a coffee!
Any, or all of the above are super helpful!!
THANK YOU!
If you don’t have access to a kiln use the following materials to make Leaf Bowls:
(affiliate linked)
Another FAVOURITE Leaf craft of ours are these Leaf Lanterns – be sure to check them out too!
Over to Lori:
How to make Leaf Bowls!
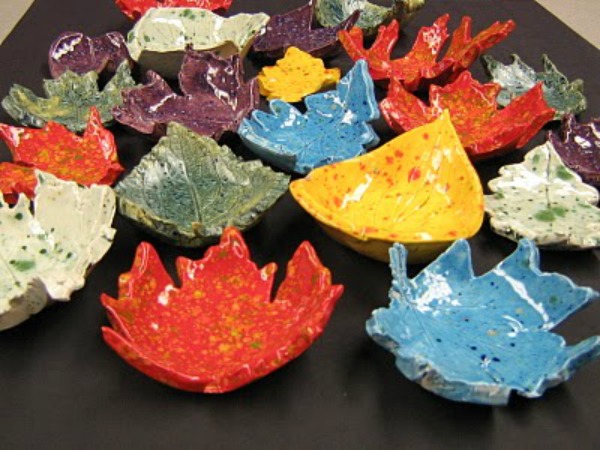
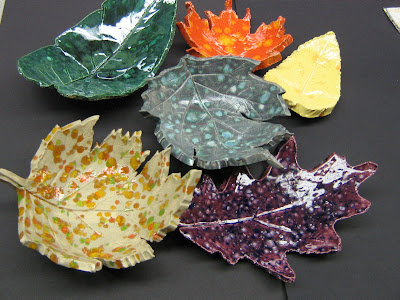
I love these fun fall leaves. They are quite easy to do if you are fortunate enough to have a kiln at your finger tips!
- Start with a fist sized lump of potters clay. Review and complete wedging of the clay as usual (to prepare it from air bubbles, etc.) [for some tips on removing air bubbles from clay, see this post here]
- Simply roll the clay into 1/4″ slabs using rolling pins and two guide sticks which help you get an even result.
- Place a large leaf over the clay- facing up so that the veins are down. You leaves as big as your hand- spread wide. Roll the leaf twice to press the design into the clay.
- Use a sharp trimming tool (thin/long nails, an opened thick paper clip or better clay tools work well here) to cut the outline of the leaf shape.
- Smooth the rough edges with one finger and a bit of water.
- Lay some plastic wrap, a paper towel or a thin cotton cloth inside of a disposable paper bowl. Lay your clay leaf inside of the bowl and gently press it down to take its new shape.
- Dry for several days and kiln process as usual.
- I love to use Sax colorburst glazes for fantastic fall results!
Have fun with this!
And here is mine, that I made with air drying clay & painted with acrylics, I let Red Ted paint it. On reflection we should have done a little “paint splashing” with a contrasting colour over the red, but I still think it looks nice:
Easy Leaf Bowls
Equipment
- Air Dry Clay
- A large leaf
- Bowl
- Cling film
- Rolling pin
- Knife
- Paint (optional)
Instructions
- Roll the clay into 1/4? slabs using rolling pins
- Place a large leaf over the clay- facing up so that the veins are down. Go over with the rolling pin to make an imprint.
- Use the knife to trim around the leaf.
- Smooth the rough edges with one finger and a bit of water.
- Lay some plastic wrap, a paper towel or a thin cotton cloth inside of a disposable paper bowl. Lay your clay leaf inside of the bowl and gently press it down to take its new shape.
- Dry for several days and then paint (or place in kiln if you have one)
Video
Fancy some more Autumn Crafts for Kids?
Or how about these Leaf Crafts!!
Happy Crafting! Hope you enjoy our Autumn Maple Leaf Bowls using Real Leaves!
maria says
They are simply gorgeous, we will definitely have a go. Thanks
Red Ted Art says
Maria – aren’t they just? We loved making ours and some friends saw it when visiting and said they wanted a go too! Will try it out with Salt Dough and see if it works too – main thing is finding a nicely shaped ovenproof bowl.
Doing the Mom Thing says
How adorable and festive. I’m not sure my toddler will like them, but I may just have to make some for myself. 🙂
April @ HomeHinges.com says
Very cool idea. I love that you can do these things with kids.
Lori says
Thanks redted! I love your idea to try the other clays…very clever. Much appreciation on your post. Love to share! Have fun with these and other ideas.
funart4kids
Kim @ Cheap Chic Home says
Quite lovely and fall inspired. Beautiful painting and glazing.
Melissa T says
These are great!
Melissa
http://burstsofcreativity.blogspot.com/
madeatgreenlodge says
have some air drying clay and this inspiration is just what I was after. My girls are going to love it.. . . . thank you
Judy says
How fun! I love that you imprint the leaf bowls with real leaves! Too cute!
Theresa says
I saw this project at It’s so very Cheri. I love it. I have a older children and this is the kind of project they would love.
Lisa says
These are very pretty! I actually did something almost exactly the same in a ceramics class in college. Love them!
ali at the good life bloggers says
Hey Maggy,
6yo is DESPERATE to make these, so we will get out the clay at the weekend when we have friends staying… a great activity for all ages!
Will report back
Ali
x
Red Ted Art says
Oooh Ali, that is fabulous! We want to make more too!!! Was such fun!! And the results so good for so “little” effort!
Maggy
ColleenwithMurals&More says
I’ve never actually done anything in a kiln. Hard to believe after all these years. What a great experience for the kids!
Thanks for linking up to Passion for Paint! Hope to see you next weekend!
Lucy says
these are great! love them
Sarah says
So great! Beautiful!
Yanet says
I’m partial to the red one because it’s my favorite color. But the are all so pretty. Great job!
welcome to our wonderland says
wow those are so cool can’t wait to show my oldest these!
Hanna says
Hi! I’m your newest follower from the Wednesday link up. Lovely blog:) You can find me at http://www.bouffeebambini.blogspot.com
LOVE these leaves
Pam @ Sallygoodin says
These are wonderful!
Jennifer says
Wow, these look great and all grown up! Love that you made them yourself. I do not have a kiln either so the air dry method would have to work for me too. They are really beautiful! I am visiting tonight from It’s so Very Cheri.
Jennifer
Red Ted Art says
Jennifer – glad you like them! Do have a go – so easy and yet effective!
Lei says
I’m here from it’s So Very Cheri… and these are just incredible! Fabulous work!!!
JDaniel4's Mom says
These are wonderful. I love the way they turned out.
J. Hill says
This tute got the most views at this week’s Mad Skills party, so I will be featuring it and your blog tomorrow morning. Grab a brag button if you would like one!
madincrafts.blogspot.com
B says
These look really great! Thanks for the post!
GeorgiaBE says
What a super fun idea! Thanks for the post!
Nichol says
These are great! I would love to make them sometime.
Michelle says
This is such a great idea.
I haven’t seen this craft before.
Thanks for sharing.
Brandi says
Those are SUPER cute! 🙂
Amy says
Thanks for linking up this great idea.. Have a wonderful weekend.
Widge says
These are beautiful!! i want a kiln now
Melissa Howard says
Beautiful – I love leaves and these are beautiful.
Kristy says
Those are really beautiful! Here from Lamb Around!
Audra says
That’s fantastic. If only I had a kiln.
Catarina says
So Lovely!
I would also like to introduce you to my blog: http://nolugarquechamocasa.blogspot.com
Hope you’ll follow back!! 🙂
Catarina
Sophia says
Awesome craft work! I liked how the colors blended on the leaves. So pretty. Let’s swap craft ideas. You can hop on my blogs at http://www.makemania.com and feel free to promote your cool craft projects!
Life in Rehab says
Wow, those do look easy, and the results are awesome.
Ally says
Wow – these are gorgeous! Thanks for linking them up to momstown.ca!
Amanda says
Hi Maggy 🙂 got this featured on Fun Family Crafts http://funfamilycrafts.com/autumn-leaf-bowls/
Red Ted Art says
Yay! Thank you so much!
Emma @Mummymummymum says
I made one of those at school many moons ago, and forgotten all about it! Lovely. xx
Kay. Shirley says
My 4th graders just made these. We are going to fire them at our local high school. I know this is a dumb question but we need to fire them before we use the glaze? I ordered the glaze you used and we can’t wait to finish them. Please let me know the order firing and glaze.I have used the kiln but we usually just paint them with acrylic. Thanks ! Kay
Red Ted Art says
Hi Kay, I am so sorry – this was a guest post and I am not a glazing expert…. but from what I remember from my pottery courses I *think* you add the glaze and then fire?
amber whitehead says
So cool I love the speckled one.
Jessica says
These are beautiful. What do you do if you don’t have a kiln? Do you have other material options?
Red Ted Art says
Hi Jessica, I have made them with air drying clay and painted them with acrylics and varnish (check out the last photo on the above). I believe saltdough works too!
Wendy says
I remember making these in grade school. Ours were bisqued, but then painted and varnished. (Come to think of it, only one of the clay crafts we did was actually glazed.) I’m still using mine, 30-odd years later.
International Elf Service says
I really love these. They look so easy and would make great presents for all sorts of people. Will be sharing!
kate says
What if you don’t have a kiln. Can you use a oven?
Red Ted Art says
I have made them using air drying clay!
Donna Woods says
Oh I LOVE these!! We might have to try the air dry version, if it is fragile, could you make it a bit thicker to sturdy it up?
Red Ted Art says
Yes, a bit thicker and use a varnish, I somehow feel it makes it stronger too!
Kirsten says
What about a clay that can harden in a home oven, such as sculpey, would that work?
Thank you.
Red Ted Art says
Yes, I think sculpey would work, but I find it quite expensive and you would need a lot?
Courtney says
Wonderful idea! I shared your post on my FB page 🙂
Red Ted Art says
Oh thank you! Much appreciated!