Easy Monster Corner Bookmarks (and Owls!)
With Father’s Day coming up, we thought these fun monster bookmarks would go down well.. the best thing is – you can make any design you want.. it doesn’t have to be a Monster Corner Bookmark, but you could make an Alien, an Owl a penguin and bear… and lots lots more. Needless to say the Monster Corner Bookmarks also make a great Paper Halloween Craft!

Make the basic Origami Bookmark and then let your imagination be your limits! We are actually going to make this simple Origami Bookmark in Pip Squeak’s reception class (4-5yrs olds) in a couple of weeks time. It will be interesting to see how they rise to the challenge of basic paper folding techniques. I know they will ADORE the decorating aspect. A super fun Craft for Boys and girls!

This is a great post to show how very versatile Paper Crafts can be.. and is the perfect Paper Halloween Craft for kids!

I also think that these monster bookmarks would be a great Halloween Craft and the Owl Bookmarks work really well as a small teacher appreciation gift or simple as a Back to School Autumn theme. So, though we are making them as a Father’s Day Craft now.. I think the possibilities are much broader!
Supplies needed for Monster Bookmarks:
- Square paper in your monster colour
- White paper scraps for eyes and teeth
- Red or pink paper for the monster’s mouth!
- Scissors
- Glue stick
- Pen for eyeballs
Watch our How to Make Origami Corner Bookmarks video here:
You can watch the handy video tutorial for the Monster Coner Bookmarks on Auto Play! Or you can follow the step by step photo instructions for your basic Origami Bookmark below! You simply then need to only add some paper eyes, zig zag teeth and a the red mouth (a handy trick for getting this size right is shown in the video!
Shaping the paper into a square
First you will need to make a square out of your paper. Corner bookmarks need squares of paper, but here we show you how to create that perfect square!!
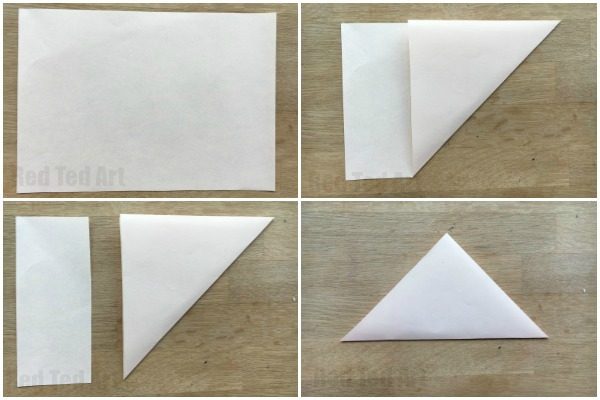
- Take your A5 sheet of paper and fold over one corner to create a triangle.
- Cut off the excess and rotate your triangle so the long edge is at the bottom and the right angle faces up. Make sure the top of the triangle is looking up and you have the long edge running perpendicular.
Folding a basic corner bookmark
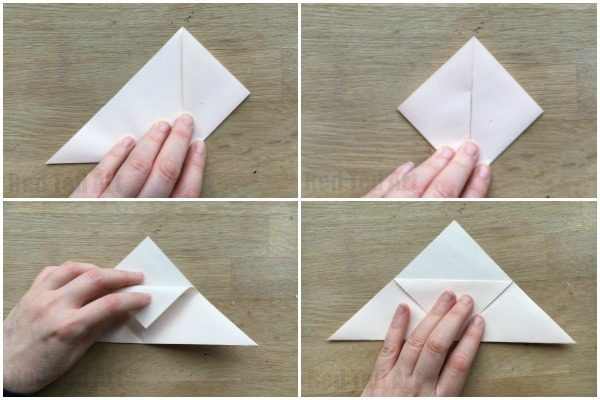
- Fold the lower right corner up to meet the top right angled corner.
- Repeat for the left side.
- Fold these two back open.
- Flip down ONE of the top sheets and crease.

- Now fold the flaps you created back up and tuck INTO your bookmark.
- Repeat for the other side
Adding the Monster Features
Now you have your basic corner bookmark, you simply have to decorate it to turn it into your monster! For this you will need to cut out:
- two white paper circles (use a penny to trace) and draw some pupils
- Some zig zag teeth (cut a rectangle and cut points into it and stick in place in one go)
- A smaller red or pink paper square, to stick inside the corner bookmark for the mouth
Done! That is how simple it is!
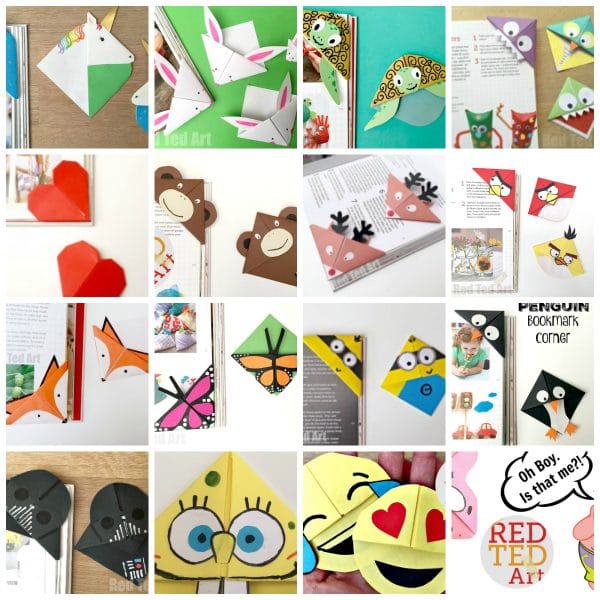
100s more Corner Bookmark designs
As mentioned above, I have not brought these all together on our Bookmark Corner Page – so you can browse all the designs at your leisure!! (Currently we have 20+ designs… but we keep updating and adding more ideas!!)