
Paper Plate Mermaid Twirler
A cute paper doll printable to decorate your child’s room! And this time it is Paper Plate Whirligig Time again. I think the last Paper Plate Twirler we did, was our Paper Plate Dragon Twirler! Or was it the Love Bug Twirler?? Either way, it has been a while!!! And with Summer and lots of lovely Summer Crafts for Preschoolers heading our way we thought a Paper Plate Mermaid Twirler may be JUST THE THING!!
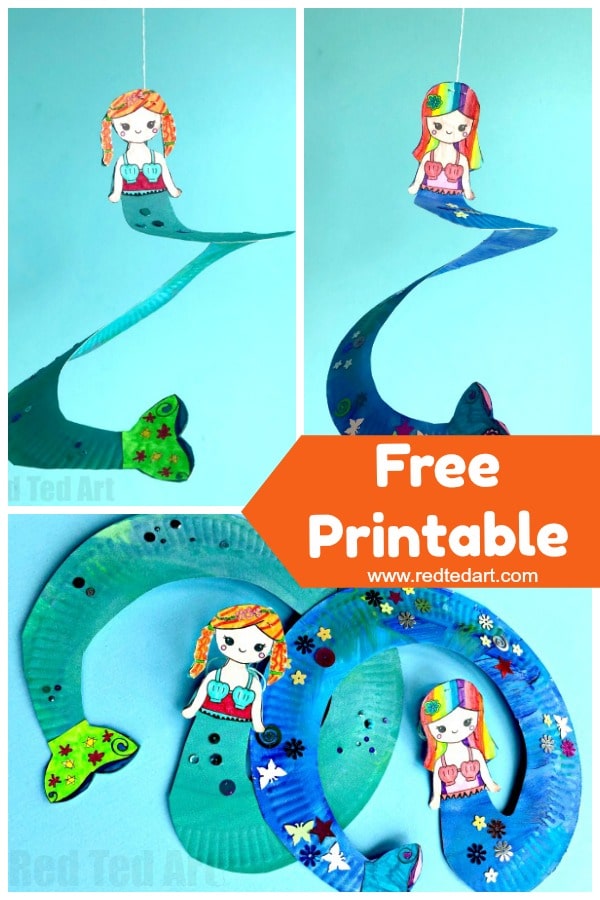
We have a printable paper doll – a FREE Mermaid Printable for you – but you can of course draw your own mermaid for this Mermaid Whirligig. So choose to use the paper doll template or draw your own!
We adore Paper Plate crafts for kids. This little mermaid craft idea, make wonderful Mermaid Room Decor crafts for kids of all ages (my daughter, aged 8, is going crazy over them!!). Oh how we adore Mermaid Craft Ideas!!
Watch our Mermaid Twirler Video Tutorial on auto play or keep reading!
Paper Plate Mermaid Twirler – Materials
- One paper plate per mermaid
- Download your mermaid printable (grab it at the bottom of this post)
- there is a design your own hair mermaid.. and a finished one
- Paint in desired mermaid colours
- Pens for coloring in and decorating your mermaid printable
- Scissors, brushes and glue stick
- String and stapler for hanging
(Enter $0 at check out or do NOT leave a tip – gumroad takes it all).

Hope you like this free printable paper dolls pdf!
How to make a Paper Plate Mermaid Whirligig
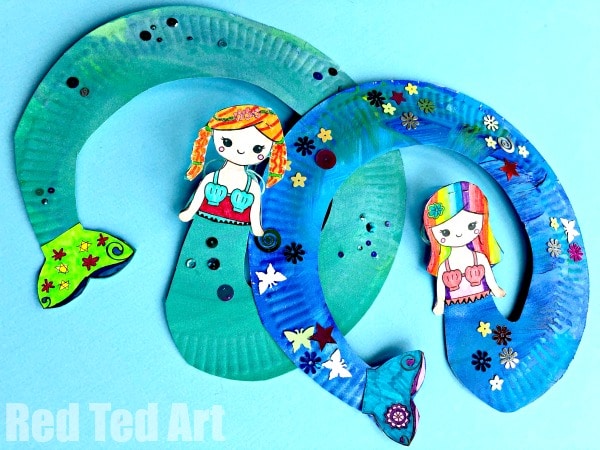
We had much fun making our twirling mermaids. This kids LOVED decorating their paper doll mermaids and customising their outfits and accessories (think lots of sequins!!).

Now the process for making your paper plate mermaid Twirler is ALMOST the same as for all the other whirligigs we have made so far.. but not QUITE – as you need to allow for the mermaid’s printable body.
Begin by painting one side of your paper plate in the desired colours.
Whilst the first side of the paper plate twirler is drying, you can continue by colouring in your mermaid printables (you can print them onto plain white paper or use light white cardstock as well).
Once you have completed the colouring, the paper plates will hopefully already be dry and you can turn them around and paint the second side (you don’t HAVE to paint both sides but we do think it is nice!).
In the meantime, you can cut out your mermaid printables.

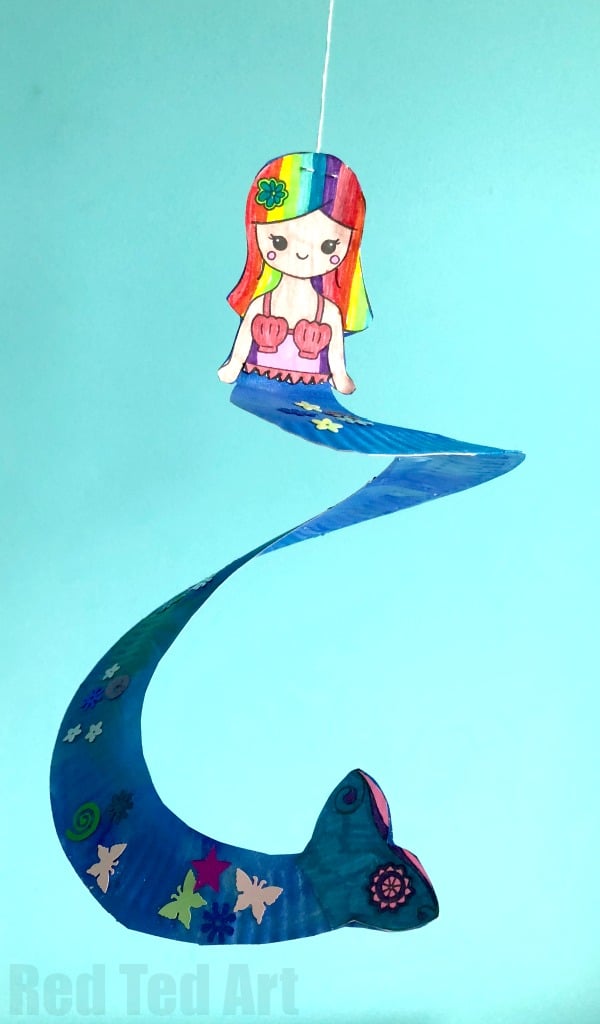
Glue your mermaid’s body to the middle of your paper plate. And the mermaid’s tail perpendicular to left of the mermaid (actually, the right is fine too.. you will simply cut the mermaid out in a different direction).
Once these are glued in place, cut out a mermaids tail – beginning at the tip of the mermaid’s tail – and getting “fatter as you come cut round the plate”. See image.

Normally you keep cutting the paper plate like a snail. But for this mermaid Twirler, you have to keep the centere in tact for the mermaid’s body – which you now cut out.
Once cut, you can decorate your paper plate mermaid’s tail with glitter glue or sequents.
Finally staple or tape on some string to your mermaid’s head for hanging.

Your Paper Plate Mermaid Whirligig is complete!
More fabulous Paper Plate Crafts

More Lovely Mermaid Craft Ideas
