
DIY Snow Globe Card
This delightful little recycled DIY Snow Globe Card is the perfect way to show friends and family just how much they mean to you during the winter months. We love a Pringle Lid Craft. They make great confetti shakers or SNOW GLOBES!
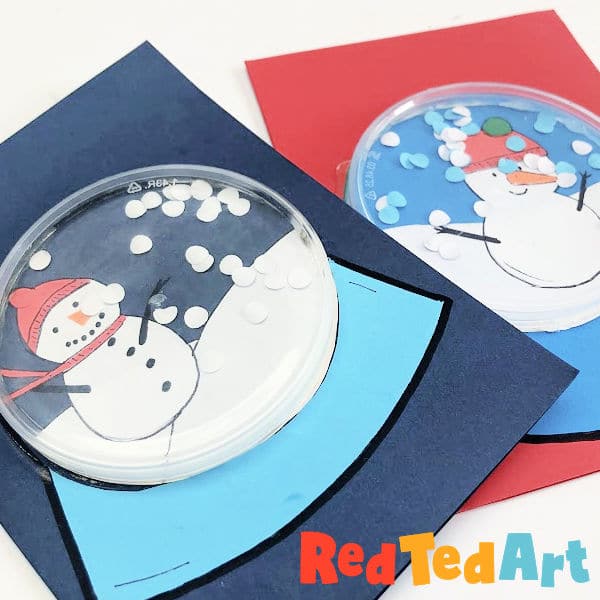
Pringle Lid Crafts – Snowglobe Cards

We love the homemade paper confetti combined with recycled plastic lids, to make these super cute and easy Holiday Cards for kids!
We all love a homemade card. They’re the best way to show someone just how much you care about them because it shows them you’ve put in effort to make them something unique and from the heart.
These DIY Snow Globe Cards are a fun to do just that and when you shake them, snow flies around just like a real snow globe! The best part is, they’re totally easy to make and they use materials that you probably have in your house. So get out your old Pringles cans and let’s get started!
Recycled Snowglobe Cards – Materials Needed:
- Coloured card (we’ve used red, blue, white and orange but you can use whatever colours you want!)
- Plastic Pringles lid – but a clear yoghurt pot lid should also work
- Black pens
- Hole punch (we used a single one but a normal hole punch works too!)
- Glue stick
- Good PVA Glue (we found a good PVA glue works best but you can use whatever works for you)
- Paper scraps for snowglobe landscape and snowglobe base (in our case snowman!)
How to make a plastic lid snowglobe card:
Start with your base for you DIY snow globe card:

Using the coloured card you want to use as your base, fold it in half and then trace the outline of your Pringles lid/ plastic lid onto the centre of it.
Decide on the design for your DIY Snow Globe Card – we decided with a more generic winter theme of a lovely little snowman. But of course you can make it more Christmassy and choose any other theme – such as a Santa, a Christmas Tree with Gifts or a cute little Gingerbread Man!
For our snowy snow globe scene: Trace the same lid outline onto a separate white piece of paper and use that to cut out a white snowy background that is the perfect size for the circle you’ve drawn.
The snowy base should fill about half of your circle.
Cut out your snowman:

Using that same white sheet of paper, draw (we did this freehand) the body of your snowman – basically you can cut out two circles and stick them on top of each other if you wish!).
Then cut this out.
Your snowman can be whatever shape and size you like, just make sure its the right size for the circle on your card. Why not check out some of our other snowman crafts for different sizes and proportions. E.g. you may like our kawaii snowmen paper clip bookmarks or our pop up snowman card for inspiration!
Add the rest fo the snowman in:

Like we said, your snowman can look however you want. So embellish your it in whatever way you think looks best.
We added a hat, scarf, eyes and a carrot nose and also some buttons.
You can add these in with different coloured card or even just a felt tip pen. Just make sure it’s all within the confines of the circle you drew.
Don’t forget to add the arms!
Make your DIY confetti snow for your snow globe:

Using your hole punch, punch lots of holes into your white paper and collect the pieces that come out.
We try and use paper snow rather than glitter as its more eco-friendly, however if you can find bio degradable glitter that would be a good option.
You can vary the colours here if you want as well. Don’t limit yourself to just white if you want to mix it up.
Once you’ve got your snow pieces, pile them up in the centre of your circle.
Glue on your snow globe lid:

After some experimentation with different types of glues, we concluded that a good strong PVA works the best. But feel free to try a few out yourself and see what works.
Coat the perimeter of the lid with a medium amount of glue.
Make sure you don’t put too much as you don’t want it to seep out of the sides when you go to stick it down.
Stick down your lid onto your DIY snow globe card:

Making sure all of the paper snow is in a pile in the centre of your circle, stick the lid over the top of it enclosing them inside.
Cut out a base for the snowglobe in a card colour of your choice and stick it down.
Now is the time to go in with any extra embellishments in black pen but make sure you do this after the glue is fully dry.
Once all this is done your DIY snow globe card is finished!
If you want to take a look at some of our other snow globe crafts, you can learn how to make an actual snow globe or look at our DIY Puffy Paint Snow Globe cards.
Check out more of our fabulous Handmade 3d Christmas Cards here:
