
How to Make a Paper Leaf: A Step-by-Step Guide
We love Autumn! All those pretty Autumn colours – reds, yellows and oranges and all those fantastic Leaf Craft Ideas heading our way. As we do love our Paper Crafts here on Red Ted Art.. our paper craft love affair continues today with these cute and Easy Paper Leaf designs. This DIY Is probably still classed as an Origami Leaf, but does involve a little glue, so maybe not quite!

These are technically NOT quite Origami Leaf Patterns, but they have their origin in origami. They are similar to the gorgeous paper butterflies we did earlier in the year, so I do hope you love this Paper Leaf Craft as much as I do!! They also have some similarities with these “not quite” origami flowers – in that they all use the accordion fold!
Let’s learn how to make a paper leaf today! The perfect Leaf Craft for Fall you could also turn these into fantastic DIY Fall Garland Ideas.
To make these paper leaves, you will the following basic supplies:

- A sheet of square paper – any paper size works, we used 14 x 14 cm
- Paper scraps if you wish to make the second version of leaf with a stem
- A pair of scissors
- A little glue
You can use sheets of origami paper to make these paper leaves, or use ordinary “printer” quality type paper in different fall colors.
As mentioned these are technically NOT quite Origami Leaves, though LOOK like they are origami leaves, but paper leaves that do require a little cutting and gluing (but not much!).
The great thing about this easy paper leaf how to, is that you do NOT need a paper leaf template to make it. You start off with a square piece of paper and work your way onwards from there. We will show you how to make a paper leaf step by step today. It really is easy and pretty and fun!
How to Make a Paper Leaf/ Simple Origami Leaf
Yes it is video time again. Most of our Paper Crafts DIYs are lend themselves to the video format – the video on auto play shows you this easy craft. Or scroll down to find a slightly longer YouTube version!
Though I have written out the basic step by step instructions for you too!
Paper Leaf step by step instructions


- Begin by folding your square piece of paper in half (top left image)
- Take a ruler and draw a line from top left of the rectangle (where the center line fold is) to the bottom right corner of the rectangle (where the folded paper opens) (middle image at the top)
- Cut along this line and put the cut offs to one side, you can use them for making a stem later.
- Now open your folded triangle to reveal a “bigger triangle”.

- Starting at the bottom edge, make your first fold approximately 0.5cm – you will keep folding to create a concertina or accordion fold until you get to the very tip of your triangle. For an accordion fold, you have to keep flipping the paper over to make the next fold. Make nice and neat creases as you go.
- Once you have reach the top of the triangle, fold the concertina in half (the long flat edges meeting, the tip being on the outside).
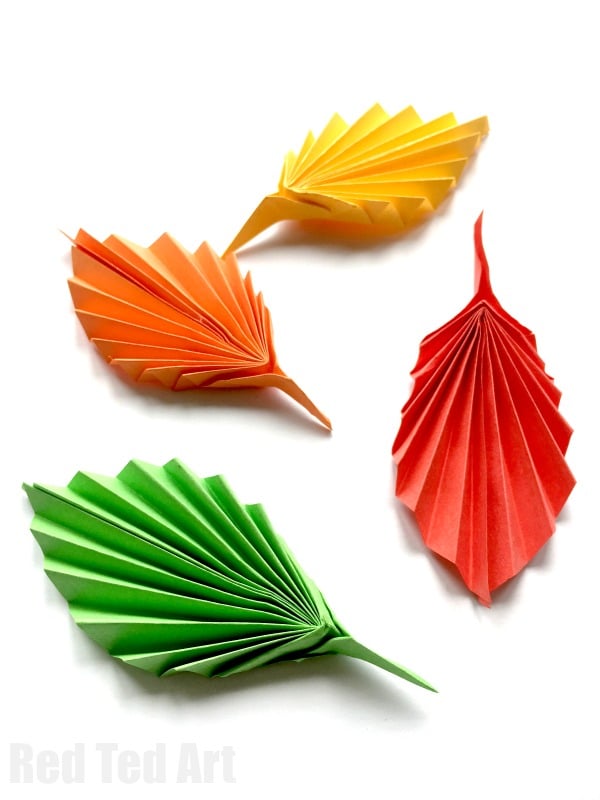
- This is your basic leaf shape. You can now glue it down and your basic paper leaf shape is already finished..
OR you can..
Making a paper leaf stem


8. Add a stem, by taking one of the discarded triangles, rolling them into a tube. Flattening it and hooking it over the bottom of your leave before gluing all in place.
If you watch the video on auto play there is a second option for making the stem too!
Done.
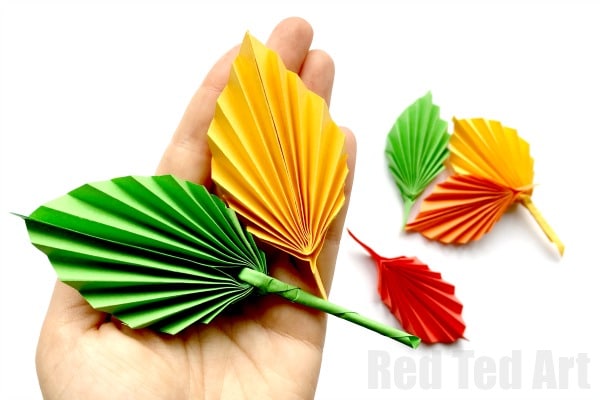
Aren’t these Paper Leaves simply stunning? I love how simple and yet effective they are just gorgeous. I think they make great decorations for fall. You could string them up as a paper leaf garland or add them to a DIY Fall Wreath. Love this Paper Leaf DIY and hope you do too!

If you are after more Paper Crafts – do check out our Paper Crafts page, which is sorted by topics and themes.. but we also have some great Origami for Kids ideas here:
As well as more fantastic Autumn Crafts for Kids here
And a fanstic set of LEAF CRAFTS here

A slightly longer version of this video is also available for viewing on my YouTube Channel: