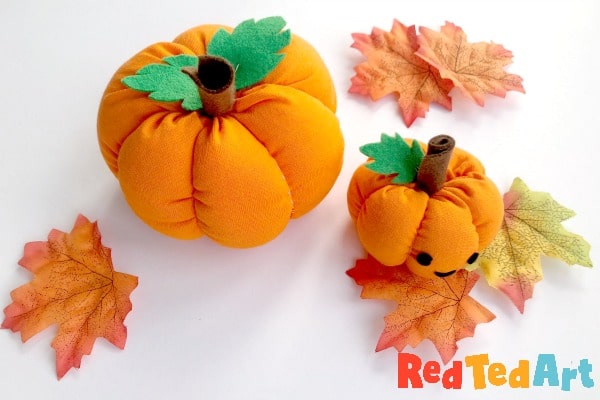
How to Sew A Pumpkin
If you have mastered the easy How to Sew a Pyramid Chicken craft popular here on Red Ted Art, you are ready for the this How to Sew A Pumpkin tutorial.. as they both start out the same way! I love crafts that have super simple patterns and are easy for kids to make too! Needless to say, this sew a fabric pumpkin how to is perfect for Fall, Halloween and as Thanksgiving Decor.

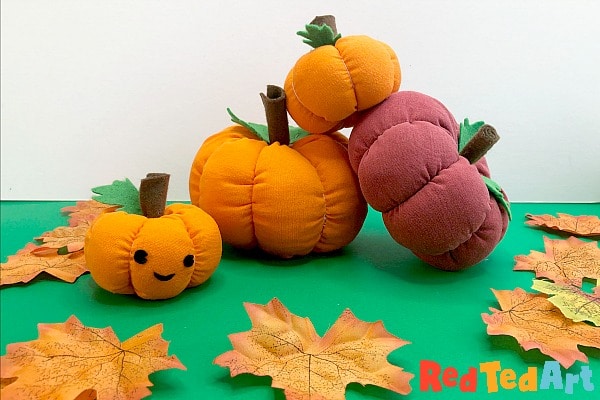
One craft.. that you can enjoy the full season ahead. We always buy mini pumpkins this time of year.. now we have our own fabric pumpkins, we won’t need to get any more!
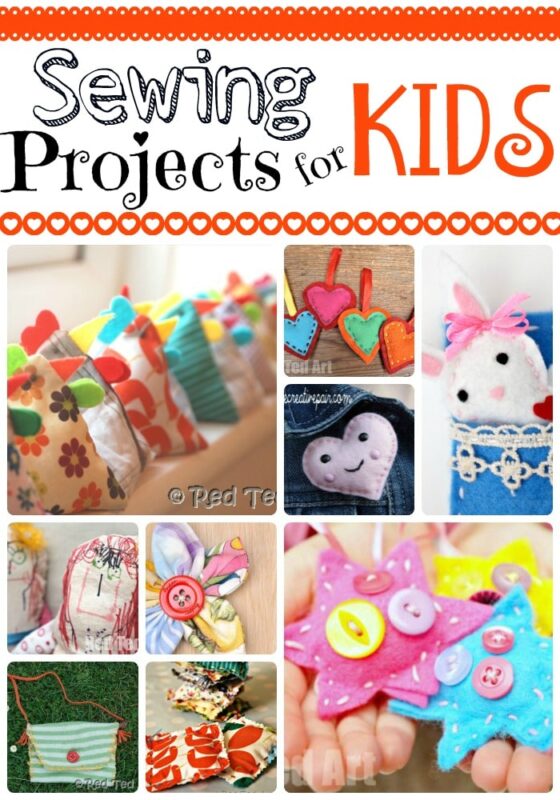
As you know, I am passionate about teaching kids to sew. Sewing is a life skill that is quickly being lost. It is also great for fine motor skills and concentration, as well as teaching kids to make “new from old” – especially with out fabric pumpkins, as we recycled old T-shirt fabric and pillows for this. Though you can use any fabric you wish! More great sewing projects for kids here. People often ask me when to START teaching kids to sew, and my simple answer is – as young as possible! When they are very little, you can do some paper plate sewing projects with them, as well as “real” sewing projects, where they do a few stitches and you complete the rest. Very much a together project and getting them interested!
Hope you do have a go at these easy fabric pumpkins! So fun.
TOP TOPS for making easy fabric pumpkins
My MAIN tip for making fabric pumpkins is the SIZE. Though I adore my big pumpkin – if you make them too big, it is very hard to run the needle through the centre. So either make them “flatter” (less stuffing) or smaller.
My second tip is (you will see below and in the video), when stuffing the pumpkin, squish to see what the final size will be and check that your needle is long enough to run through the centre.
Finally, if there is a super wrinkly segment, that you are not so happy about.. cover it up with your felt pumpkin leaf. Job done!
How do you make a pumpkin with real stems?
This is the super fun and easy bit! Make your basic fabric pumpkin and then simply hot glue on your real pumpkin stem! Easy peasy! You can even add a fake leaf or felt leaf if you wish!
How do you make a no sew fabric pumpkin?

Can yoy make a new so fabric pumpkin??! Aha! A popular question indeed. If you want the “look” of a sewn fabric pumpkin, you can indeed achieve this with “no sew” methods. But there is a little bit of a cheat – you usually need to start off with a tube of fabric – e.g. a sleeve from a shirt or jumper or a hessian bag with the top and bottom cut off. Visit Paper Mart for a great tutorial on these.
What can I use for pumpkin stems?
The answer as always is: look what you have around the home. Don’t go and buy any craft supplies especially!! We used some felt rolled up, but I think a stick from a nature walk would be lovely too. So –
- a real stem
- a stick
- some felt
- some of the original fabric with yarn wrapped around
- pipecleaners
- sisal rope & cinnamon
What can you find? Let me know!
How do you make a small fabric pumpkin?
All depends on the size of your fabric. My red pumpkin fits snuggly into both hands and the fabric i used was approx 30cm x 15cm (12inch x 6inch). Experiment with fabric sizes!
How do you make a pumpkin plush?
Well.. these pumpkins ARE pumpkin plush toys too! Especially if you add cute little kawaii face to them. I did this my cutting out black felt features and gluing them on!
What do you need to make a fabric pumpkin?:
- Autumn or Halloween Fabric – we used left overs from making t-shirt yarn
- The fabric needs to be twice as long as it is high (like our pyramid chickens)
- Toy stuffing (we recycle old pillows)
- Sewing thread
- Scissors
- Felt.. or any of the aforementioned pumpkin sticks
- Optional: embroidery twine or sisal string – but we used thread doubled over for strength
- Optional: glue to secure the stem/ leaves, but you can sew these in place too
I can happily say that our DIY Fabric Pumpkin is about 95% recycled! Woohoo!
How do you sew a pumpkin?
Now comes the fun part! Woohoo!

Cut out your fabric – twice as long as it is high. Our first one was approximately 30cm x 15cm (12inch x 6 inch). However, I didn’t “over stuff” this red pumpkin, which allowed me to feed the needle through the centre. The large orange pumpkin I made was quite difficult, as my needle wasn’t quite long enough…. for best results, start off with a small pumpkin – e.g. 24cm x 12cm (or 10inch x5inch) as it will be easier to feed the needle for the pumpkin segments. More to that below.
This was the top back “panel” of our tshirt that we recycled into t-shirt yarn. T-shirt fabric is hard to cut neatly. Don’t worry too much. Just get it as neat as you can. Using other fabric is of course easier and you are welcome to use “normal” fabric too!
Fold the fabric in half so you get a square. Make sure the “right side” of the fabric is on the INSIDE of your fold.
So the line opposite the fold. I used a back stitch for this, though you can machine sew it too. Once sewn, you will have a “tube”.
Using a running stitch, sew around the bottom of your fabric – don’t sew the fabric together, but sew along the edge.

You can now pull on your running stitch and gather the bottom of your fabric. Secure the gather with some stitches if need be.
Turn the fabric the rightside round – so your gathered bit is now on the inside.
Stuff. The stuffing is a bit of guess work. The more you make the easier you will find it. I think add a little more than you think – to avoid the tshirt yarn looking wrinkly at the end. With “normal fabric”, you should get less wrinkles anyway.
Now, make a running stitch all along the top.
Gather again. Push the gather “inside”, so it isn’t sticking out. Though some people like to use the “gathered bit” as their stem. So you can always wrap this with yarn. You can also insert your step into this gather section and sew it in (I decided to glue mine in later). Secure the gather with some stitches.
The steps so far, should easily be managed by a beginner sewer!
Making the fabric pumpkin segments

This is the super fun bit, BUT some beginner sewers may find it fiddly and may need assitance. It is helpful to have a LONGER needle for this.
Get a long piece of embroidery twine or double up thread and secure to the bottom of top of your pumpkin with a knot.
Bring it over the outside of the pumplin and push through the centre. Make it as tight or loose as you want – depending on the final look and feel of your pumpkin.
Repeat. Make sure the needle goes from top centre to bottom centre (ie through your gathers. Also make sure your segement are equally spaced. Some find it easyer to do “opposite sides first”, then quarter, then turn into eighths. Though six segements also look nice.
Tie of the thread.
Make a stem and leaves. I cute small rectangle of brown felt. Rolled it up and secured it with stitches. I also cute some felt leaves.

Sew these or hot glue these in place.
Your easy sew fabric pumpkin is finished! So cute.
Optional fabric pumpkin cuteness
My daughter asked me to add a cute face to one of our orange pumpkins! I did this by gluing on some black felt! Hooray.
I think these fabric pumpkins make adorable Thanksgiving Projects!

More ideas for Thanksgiving here:

More sewing projects for beginners here: