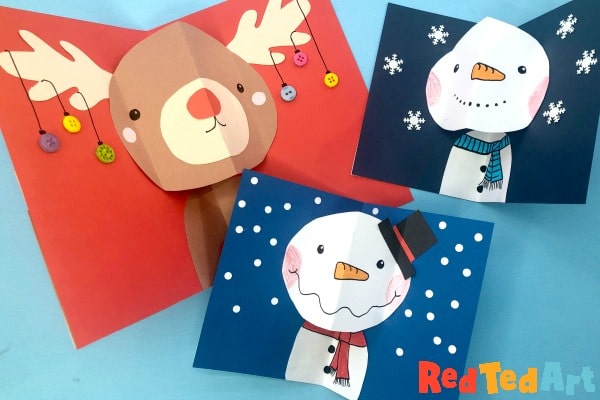
How to design a pop up Reindeer Card for Christmas
Our love for DIY Pop Up Card Projects continues. Making pop up cards is so fun and surprisingly easy! And pop up cards for Christmas are extra special. So today, I show you how to design a pop up reindeer card for Christmas! Yes, you can design you very own rudolph or reindeer and turn that into an easy to make pop up card in simple steps!
Our love for DIY Pop Up Card Projects continues. Making pop up cards is so fun and surprisingly easy! And pop up cards for Christmas are extra special. So today, I show you how to design a pop up reindeer card for Christmas! Yes, you can design you very own rudolph or reindeer and turn that into an easy to make pop up card in simple steps!
As mentioned, the great thing about these pop up cards, is that once you have learned the basic mechanism of how this pop up card works, you can design any card you like! I decided to make this particular 3d Rudolph Card “quite big” – it is an A4 sheet folded in half – resulting in a large A5 card. However, you can quickly and easily adapt this card to suit a more regular A6 card instead. Also, you can easily switch out colours and design elements to suit your tastes and needs. E.g. I added little button christmas ornaments – you can leave these out, or hand draw some ornaments. Or you can create a collage effect by cutting out some Christmas gift wrap to make the “baubles” with. Lots of options for you!
Pop Up Rudolph Card – materials needed:
- A4 sheet of card for your card – as mentioned, you can make it smaller too
- Paper in reindeer colours – so I used a brown and a beiged coloured paper
- Paper scraps (red for the nose etc)
- Scissors
- Glue stick
- Pens
- Buttons for Christmas ornaments (optional)
For those of you who would like printable worksheets and templates, do head over to my Teacher’s Pay Teacher’s store. Or read on and follow the detailed step by step instructions!

How to design a pop up reindeer card:
We have used the basic pop up mechanism for these cards before – check out our fun Emoji Pop Up Cards, or the Halloween Cards made here. BUT, I have further simplified the mechanism, so now it is a simple concept – design, fold and glue in place.
Watch our easy to follow Pop UP Reindeer Video or the following Step by Step Instructions!
How to make a Pop Up Reindeer Card – Step by Step

The size of your card will determine the size of the Reindeer you need to design! So you can make this any size you want (if making from scratch).
Begin by folding the card stock in half. Once the card is folder – this will ROUGHLY be the same size as your Reindeer’s head!
Draw an oval ish shape the width of the card on your brown paper. Cut out.
Check for size against the centre fold of the card.
Draw an upside U that fits below the oval and cut out – this is Rudolph’s body.
Now let’s get Rudolph’s features, cut – you will need:
- a beige overal that is about 1/4 the size of the head
- a small red oval nose
- some beig antlers – start by drawing a fat “line”, then draw branches off it. Don’t worry if it looks messy. Cut out two at the same time
- cut two rosy cheeks
Take all your pieces and postion together to see if you like the look of your paper reindeer! (Don’t glue them on! You are just checking the positioning of everything).
Check that all the pieces fit together on the card. The antler’s will need to lie a little “flat” to make sure they fit in nicely and also to allow for the button ornaments.
Glue your facial features together (add the antlers later) and add eyes and mouth.
Fold Rudolph’s paper body in half and glue it place along the central line.
Fold Rudolph’s face in half – with the features outside.
Then fold up the ends – it will look a bit like a W.
Add glue to the flaps and glue in place.
Now glue the antlers in place, by sliding them behind the head.
Glue the buttons down and add bauble details in black pen.
Now if you wish, you can repeat the process in “miniature” and make a small reindeer to go on the front of the card. Glue in place and trim the edges for a perfect fit!
What do you think? Isn’t it fun!! Happy Handmade Christmas Card Crafting!!! Remember, we have many more ideas for you to check out on Red Ted Art… keep browsing!
See all our Handmade 3d Christmas Card Projects here:
Related Articles
- Easy Pop Up Snowman Card
- More wonderful Reindeer Crafts
- Handmade 3d Christmas Cards
- More Christmas Cards for Kids
- Thank you cards to make in the New Year
- See all our Pop Up Card Projects
- More amazing paper crafts for kids


